This post may contain affiliate links. Please read our disclosure policy.
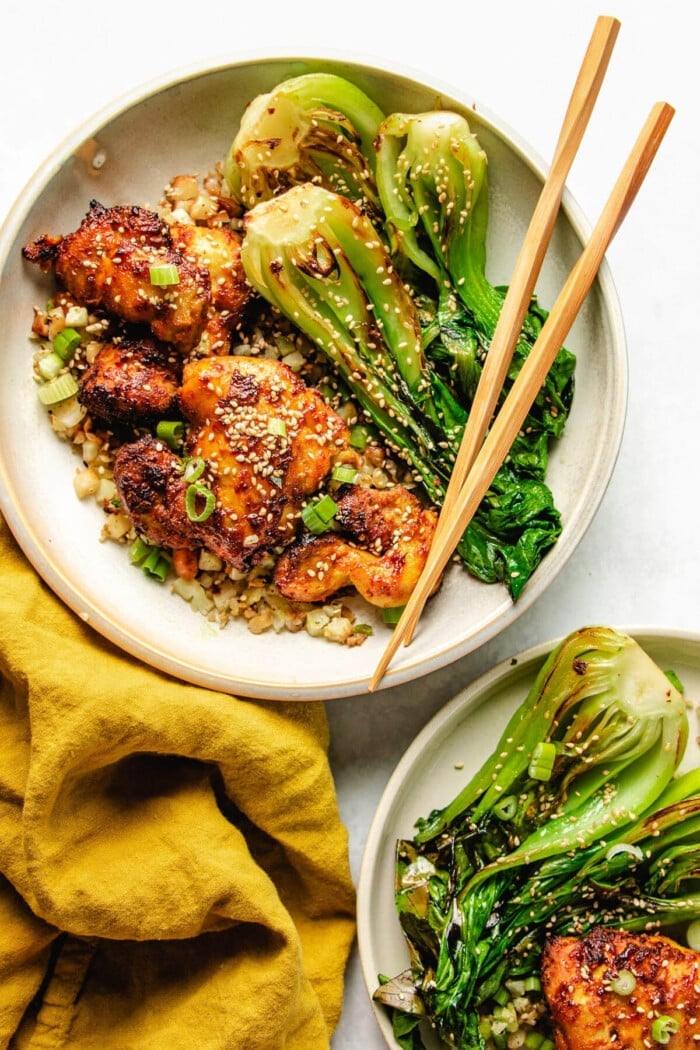
Chinese Lemon Chicken is one of my favorite takeout dishes, but this homemade version is even better! Chicken breast cutlets are coated in a crispy golden crust—no deep frying needed. The Chinese lemon sauce is zesty, slightly sweet, and bursting with fresh lemon flavor.
I’ll show you how to make the best lemon honey sauce at home. Whether you pan-fry or air-fry, the chicken gets super crispy with minimal oil so it’s light yet satisfying. Pair with rice and veggies for an easy weeknight meal!

Table of Contents
Inside this recipe with ChihYu
Chinese-Style Lemon Chicken is a popular Chinese-American takeout dish, typically made with chicken breasts that are either filleted or cut into chunks. The chicken is coated in a dry or wet batter, deep-fried (sometimes double-fried) until crispy, then tossed in a sweet-tangy lemon sauce made with lemon juice, sugar, water, and starch.
I first had this dish as a grade school student in NYC, and while the chicken was crispy, it lacked flavor. The sauce tasted overly sweet, artificial, and not fresh—definitely not what I was hoping for.
For my homemade version, I wanted something simpler, lighter, and full of flavor. Instead of deep-frying, you can air-fry or pan-fry the chicken while still getting that crispy, golden brown crust. And the lemon sauce? It’s bright, citrusy, and balanced—you’ll want to drizzle it over everything!
Main Ingredient Notes
A great lemon chicken starts with simple, fresh ingredients. Here are my ingredient tips for super crispy chicken and how to make a Chinese lemon sauce that truly pops!
For a full list of ingredients, see the recipe card at the end of the blog post.
For the Crispiest Chicken
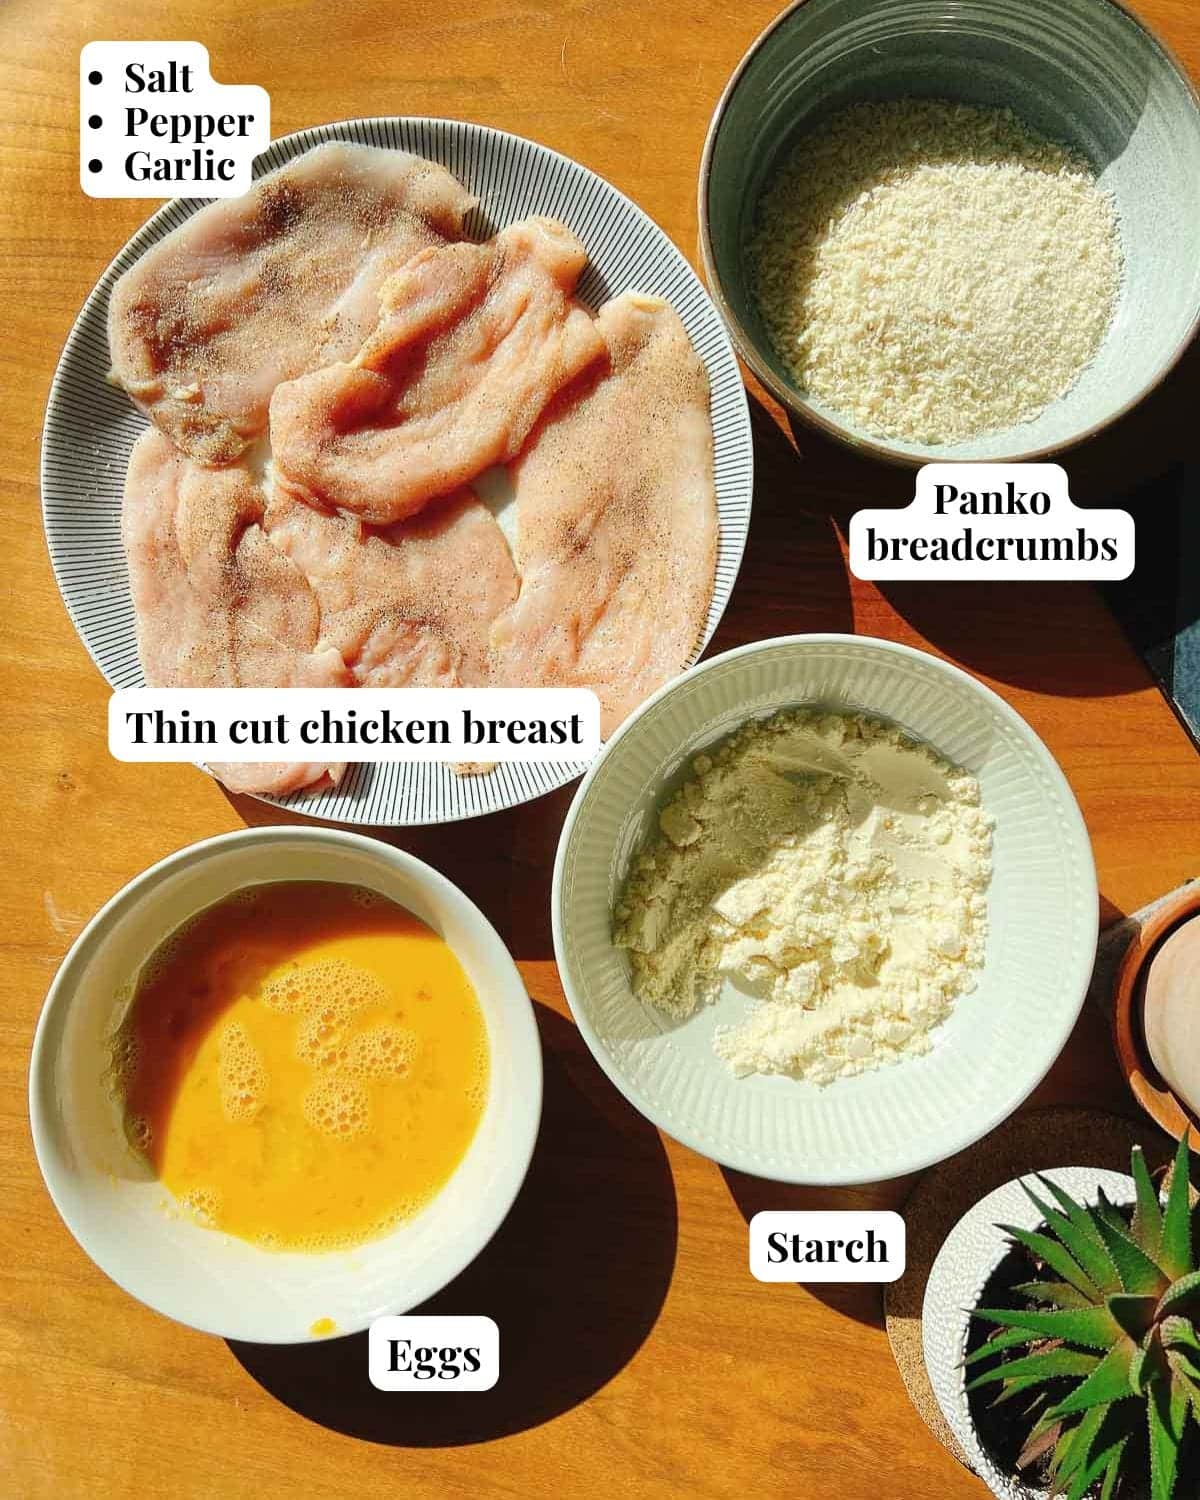
- Thin-Sliced Chicken Breasts: Instead of chunks, thin-slicing the breast keeps things simple while allowing the chicken to crisp up nicely when pan-frying or air-frying. If your chicken breast is thick, slice it in half.
- Tapioca Starch: This is the secret to getting truly crispy chicken without flour and deep frying!
- Substitution: Use arrowroot or potato starch or, for a low-carb option, whey protein isolate.
- Panko Breadcrumbs: Creates a golden, crispy crust without deep frying.
- Substitution: Use rice panko for gluten-free or pork panko for low-carb.
The Perfect Chinese Lemon Chicken Sauce
- Ginger and Garlic: Lightly sautéed to bring depth to the sauce. Most takeout spots skip the aromatics, and the flavor is just not there. Don’t skip them!
- Honey: Honey adds a rich sweetness to round out the sauce. It’s a healthier option than sugar and naturally thickens the sauce a bit.
- Fresh Lemon Zest and Juice: It’s very important that you use fresh lemon! We will use both the zest and the juice for a truly bright and flavorful dish.
- Lemon Extract: While you won’t find this ingredient in other recipes, it’s a game changer! When developing this dish, I noticed that simmering the sauce dulled the lemon flavor a bit too much. A dash of lemon extract brightens the dish and brings the lemon-forward flavor I love.
- Substitution: Add extra lemon zest and increase the lemon juice by 1-2 teaspoons.
How to make Chinese lemon chicken
This recipe includes both pan-fry and air-fry methods, so you can choose what works best for you. Since we’re not deep frying, cooking temperature and timing are key for crispy, juicy chicken.
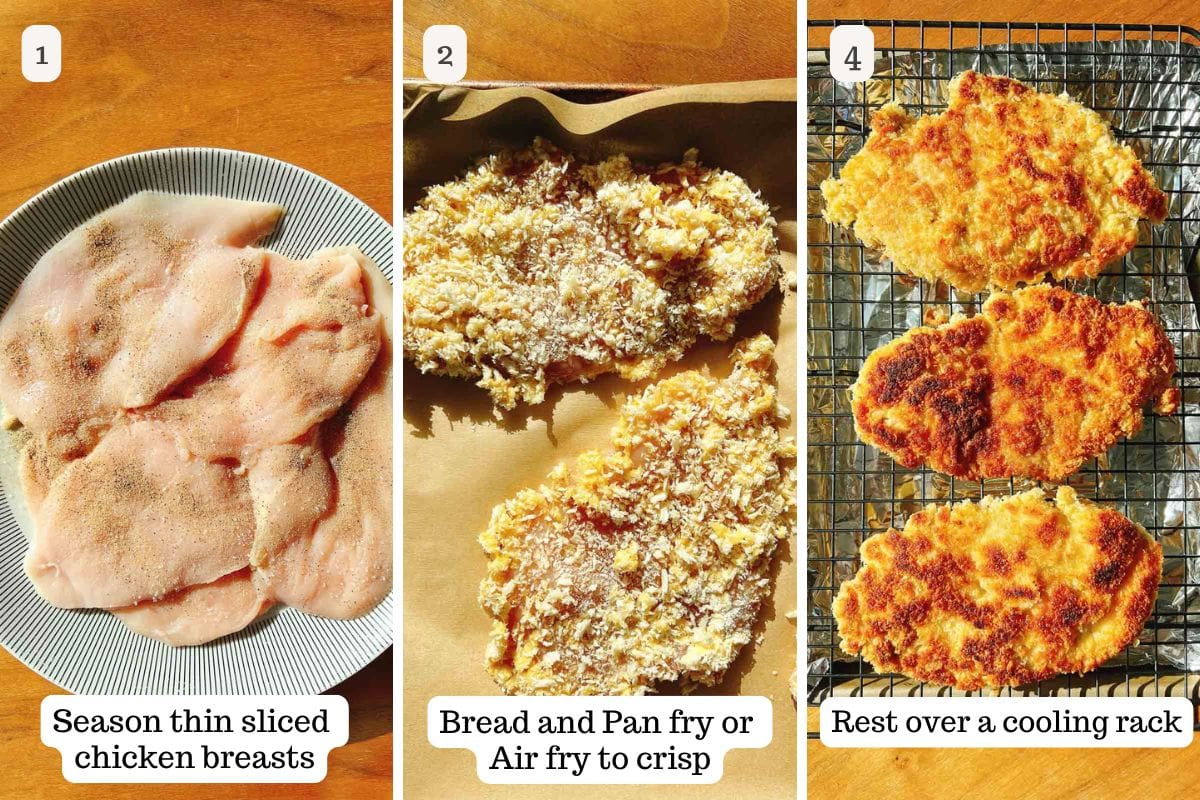
- Season and Bread the Chicken: Pat the chicken dry. Season both sides, using your hands to press the seasoning in for extra flavor. Bread by dipping the chicken into the egg, then starch, back into the egg, and then the panko.
- Pro Tip: Set up your breading station (egg, starch, breadcrumbs) before you begin breading for an easier process.
- To Pan Fry: Use a large pan (about 12 inches) and preheat it properly. Be sure to use enough oil so the chicken crisps up and doesn’t burn. Cook in batches to avoid overcrowding. Pan fry for 3 minutes per side.
- To Air fry: Be sure to preheat the air fryer to 380°F (193°C)—starting with a hot basket helps with browning—and lightly spray both sides of the breaded chicken with oil. Air-fry for 8 minutes, flip, and cook for 4 more minutes.
- To Keep Your Chicken Crispy: Once fried, let your chicken rest over a cooling rack. This lets excess oil drain and prevents sogginess.
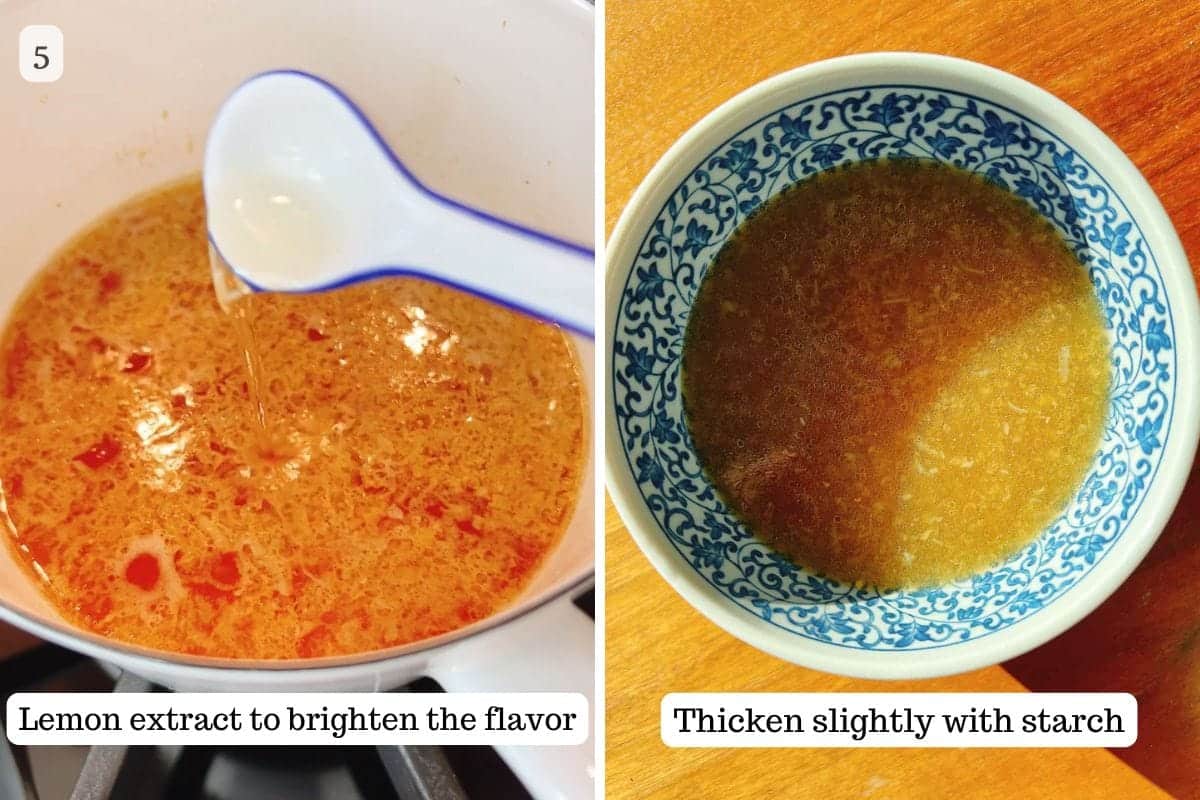
- How to Make Lemon Chicken Sauce: Sauté the aromatics to release their flavor. This is the foundation of the sauce. Gently simmer the sauce ingredients (don’t let it boil). Add a slurry of starch and water to thicken the sauce—careful not to over-reduce it.

- Drizzle and Serve: For the crispiest chicken, only add the Asian lemon sauce as you’re about to serve it. Be sure to add extra sauce on the side for dipping!
Pairing ideas
This dish is so bright and flavorful! I recommend pairing it with light sides so as not to overpower the flavors of the Chinese lemon sauce. You can’t go wrong with simple rice and veggies.
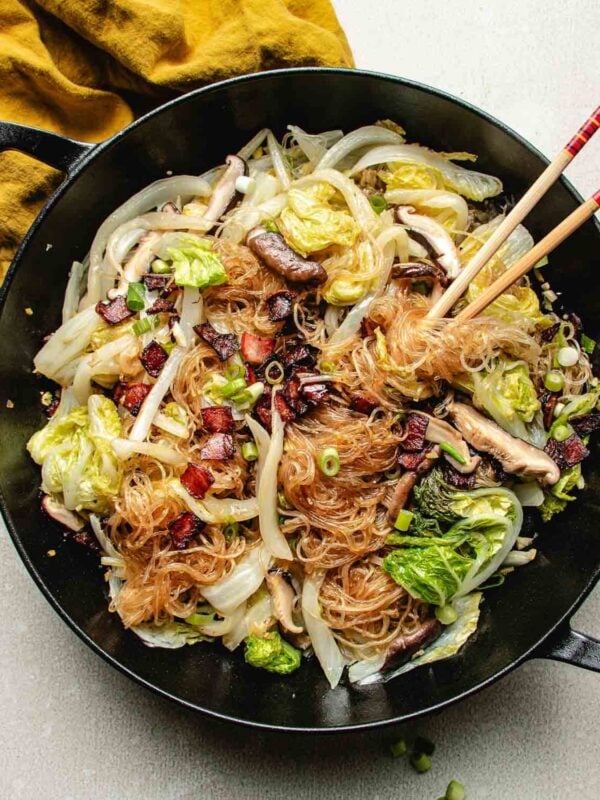
- Vegetable sides: Simple takeout-style sides like sauteed bok choy, a Chinese broccoli stir fry, or Chinese garlic green beans lets the flavor of this chicken shine.
- Rice and noodles: Serve with rice cooker white rice, this Panda Express fried rice, or my saucy Cantonese chow mein for a full takeout experience at home.
- How my family would serve it: In true Chinese fashion, we would eat this dish with three dishes and a soup for family style. Pair with my chilled silken tofu, sauteed Taiwanese cabbage, and daikon soup for an authentic meal!
ChihYu’s helpful notes
- Not double fried or deep fried: We use thin cut chicken breasts and either pan fried or air fried to keep this dish lighter. Be careful not to overcook it or the breading might burn and have a bitter taste.
- Use fresh lemon juice (not bottled): Freshly squeezed lemon juice gives the Asian lemon sauce its bright, tangy flavor. Bottled juice has a dull, slightly bitter aftertaste, which can throw off the balance of the sauce. Trust me—fresh is worth it!
- Adding a touch of lemon extract: Lemon extract is a secret weapon! During testing, I found that simmering the sauce dulls the lemony taste. A small dash of extract restores that fresh, zesty punch, making the sauce taste just right.
- Breading your chicken: Dip each piece into the egg, then starch, back into the egg, and finally into the panko. The second egg dip is key—it acts like glue so the breadcrumbs stick better. Shake off any excess before frying to avoid a thick, uneven crust.
- How to keep chicken crispy: After frying, rest the chicken on a wire rack instead of a plate. This keeps air circulating and keeps it from getting soggy. Also, don’t pour the sauce too early—drizzle it right before serving.
More lemon chicken recipes you might like
Lemon and chicken are a perfect match! Bright and tangy lemon balances the richness of chicken and keeps the meat juicy and tender. Give these Asian lemon chicken recipes a try!
- Baked lemon chicken leg quarters with a Japanese-inspired lemon chicken marinade!
- Air fried lemon chicken bites—juicy crunchy mini chicken bites!
- Lemon thyme chicken thighs—crispy chicken skin and juicy meaty bites. Super addictive.
- Air fryer lemon pepper chicken wings—extra crispy, ready in 30 minutes!
Chinese lemon chicken recipe

Video
Ingredients
For the chicken:
- 1 lb thin sliced chicken breasts
- Sprinkle coarse sea salt
- Sprinkle ground black pepper
- Sprinkle garlic granule
- 2 large eggs whisked
- 6 tbsp tapioca starch
- 1.5 cup panko breadcrumbs rice panko, or pork panko
- 8 tbsp avocado oil pan fry, divided, or oil spray for air fryer
- Half one whole lemon sliced to wedges (garnish)
Chinese lemon sauce: (makes 1 cup)
- ½ tbsp avocado oil
- 0.25 oz garlic clove grated, about 1 large
- 0.2 oz fresh ginger root grated
- 1 tbsp soy sauce or coconut aminos
- 1 tbsp honey
- ⅔ cup chicken stock
- 1 whole lemon zest
- ⅓ cup freshly squeezed lemon juice about 1.5 whole lemons juiced
- 1 tsp lemon extract
- 3 tsp starch
Instructions
To cook the chicken:
- Pat dry the chicken and lightly season with salt, pepper, and garlic granule on both sides.
- Set up your workstation with 3 shallow bowls and 1 large plate. Fill the first bowl with whisked eggs, the second bowl with starch, and the third bowl with panko breadcrumbs. Use the large plate to place the breaded chicken.
- Dip the chicken into the egg, starch, then back to the egg, and with a final stop on the breadcrumbs. Repeat the process until you finish all the chicken.
To Pan fry:
- In a large pan (12-inch), preheat it with 2 tbsp oil over medium heat until the oil is hot. Test it by placing a chopstick into the oil and if there are small bubbles around, the oil is hot enough. Add the chicken into the pan with some space between, pan fry for 3 minutes per side. Add 2 more tablespoons of oil when you fry the flip side. Repeat the process for the second batch.
To Air fry:
- Air fry at 380°F (193°C) for 8 minutes, then cook the flip side for 4 more minutes. You might need to cook them in two separate batches.
Keep chicken crispy:
- Rest the chicken over a cooling rack so they stay crispy.
To make the sauce:
- In the meantime, in a small saucepan, saute the garlic and ginger with oil over low heat until it starts sizzling, about 1-2 minutes. Add the rest of the ingredients from soy sauce to lemon extract. Stir and bring the sauce to a gentle simmer, about 3 minutes.
- To thicken the sauce, combine the starch with 1 tbsp water in a small bowl and add it to the sauce. Keep stirring and the sauce should turn thicker in 1 minute. Taste and adjust the flavor. It should be bright, citrusy, fresh, and balanced with sweetness from the honey.
To serve:
- Slice the chicken and place them over a serving platter. Garnish with a few extra lemon slices. Drizzle with lemon sauce right before serving. Serve extra sauce on the side. Serve hot and immediately.
Notes
- Lemon Juice – Use freshly squeezed lemon juice for the best flavor. Store-bought lemon juice just doesn’t have the same fresh, sharp taste.
- Lemon Extract – In my recipe testing, I found that a touch of lemon extract really helps the lemony flavor come through. Without it, the sauce loses some of its brightness, especially after heating on the stovetop.
- No lemon extract? Add extra lemon zest and increase the lemon juice by 1 teaspoon. You can also stir in ¼ teaspoon of white vinegar for extra tang, but don’t overdo it—too much can make the sauce too sharp.
- How to Keep the Chicken Crispy – Rest the chicken on a wire cooling rack while frying the remaining batches. I’ve tested pouring the sauce earlier, and the chicken quickly loses its crunch—so drizzle the lemon sauce right before serving for the crispiest results.
- Low-Carb Substitutions:
- Tapioca Starch → Whey Protein Isolate (for coating)
- Panko Breadcrumbs → Pork Panko
- Honey: In my testing, keto honey works well as a substitute for regular honey. Use xanthan gum instead of starch to thicken the sauce.
- Make-Ahead Tips: You can make the lemon sauce 3-4 days ahead and store it in the fridge. Just stir it well before using it to redistribute the starch evenly—I found that it tends to settle at the bottom over time.
- Storage & Reheating: Store crispy chicken and sauce separately so the chicken doesn’t get soggy. To reheat: Microwave the chicken and sauce separately on medium power for 1 minute at a time, loosely covered, until warmed through.
Nutrition
Nutrition information is automatically calculated, so should only be used as an approximation.
Made a dish and loved it? Please rate the recipe and leave a comment in the section below! It helps my blog grow organically, allowing me to continue sharing free and awesome content with you. Thank you!


DELICIOUS!!!!
Thank you so much!
This was so easy to make and my son loved it! I used the left over lemon sauce for my shrimp and broccoli. So so yummy!!
Thank you for making the dish! I love that lemon sauce very much, too!