This post may contain affiliate links. Please read our disclosure policy.
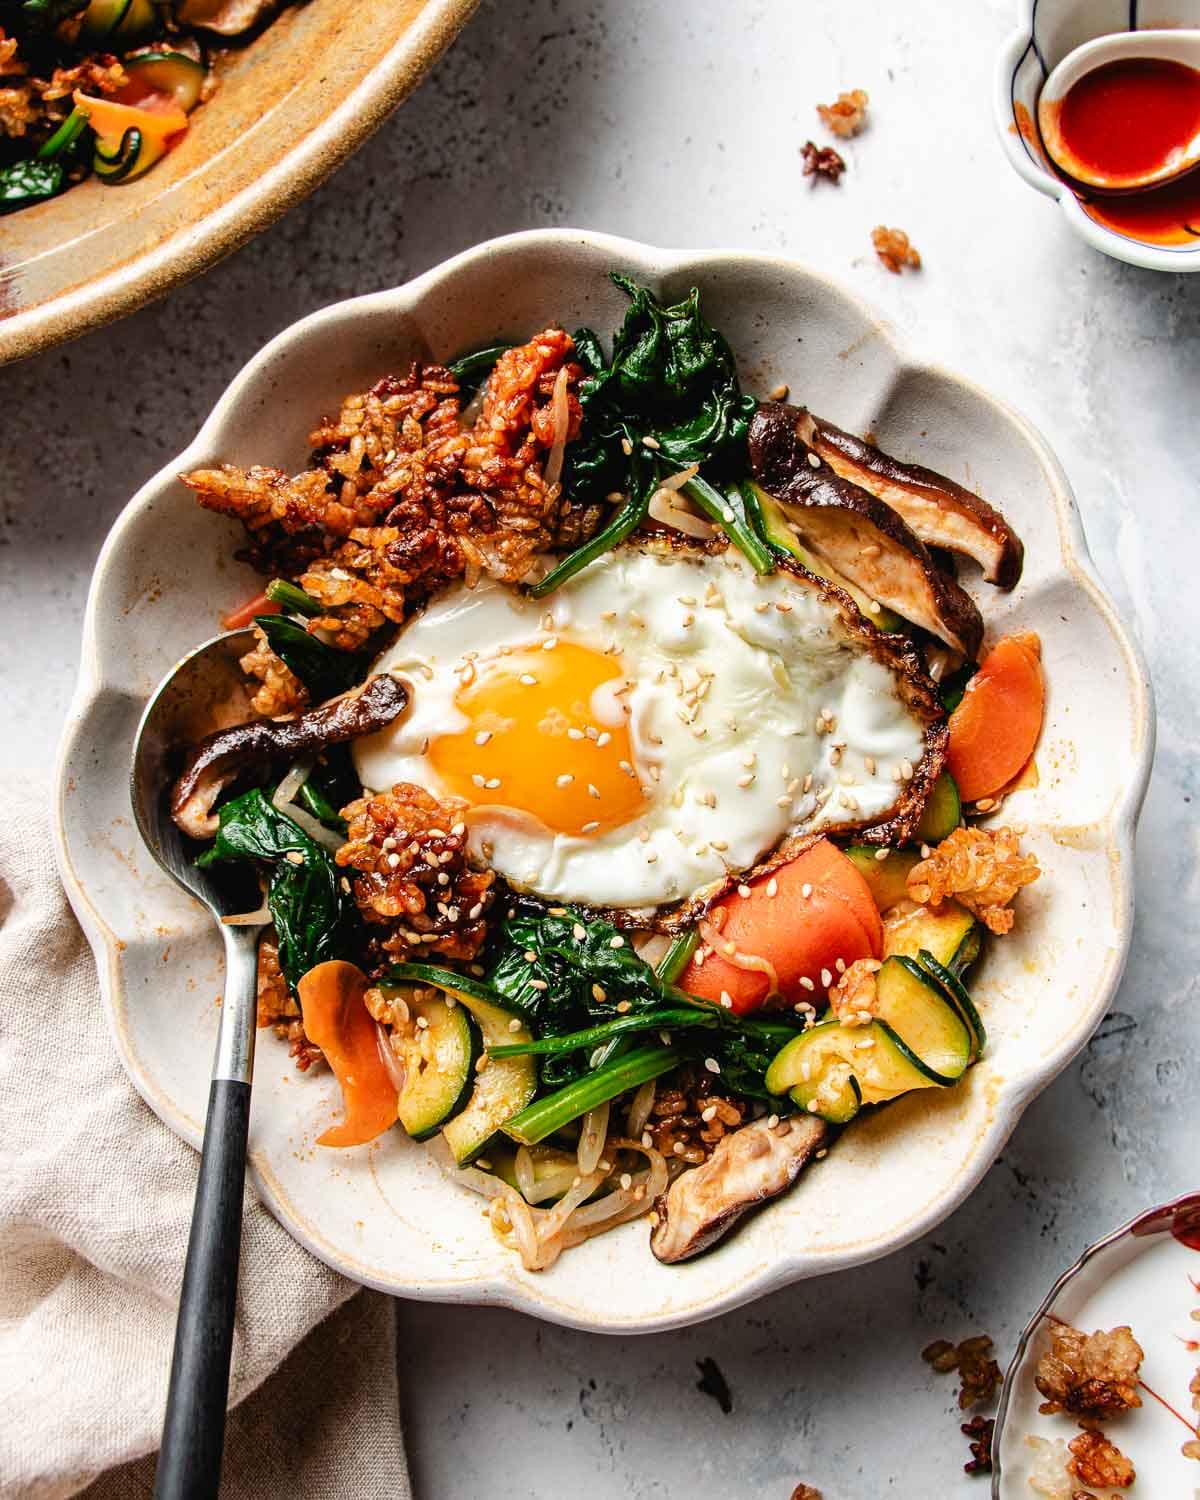
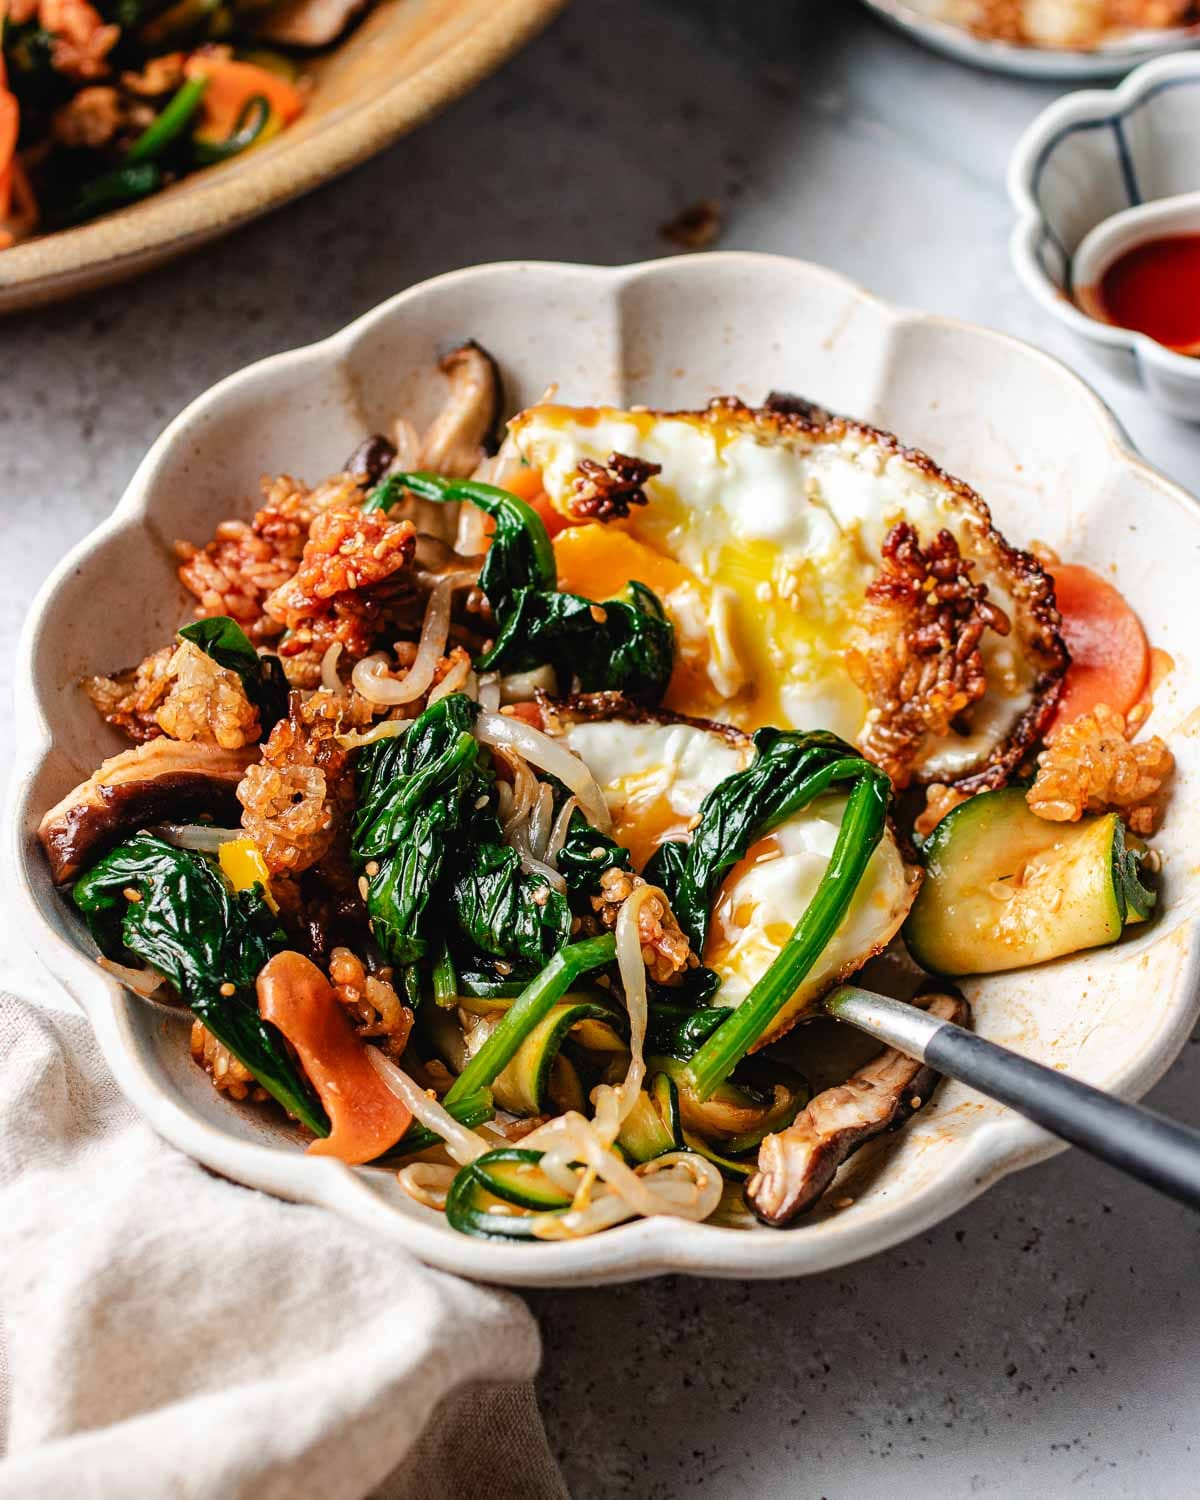
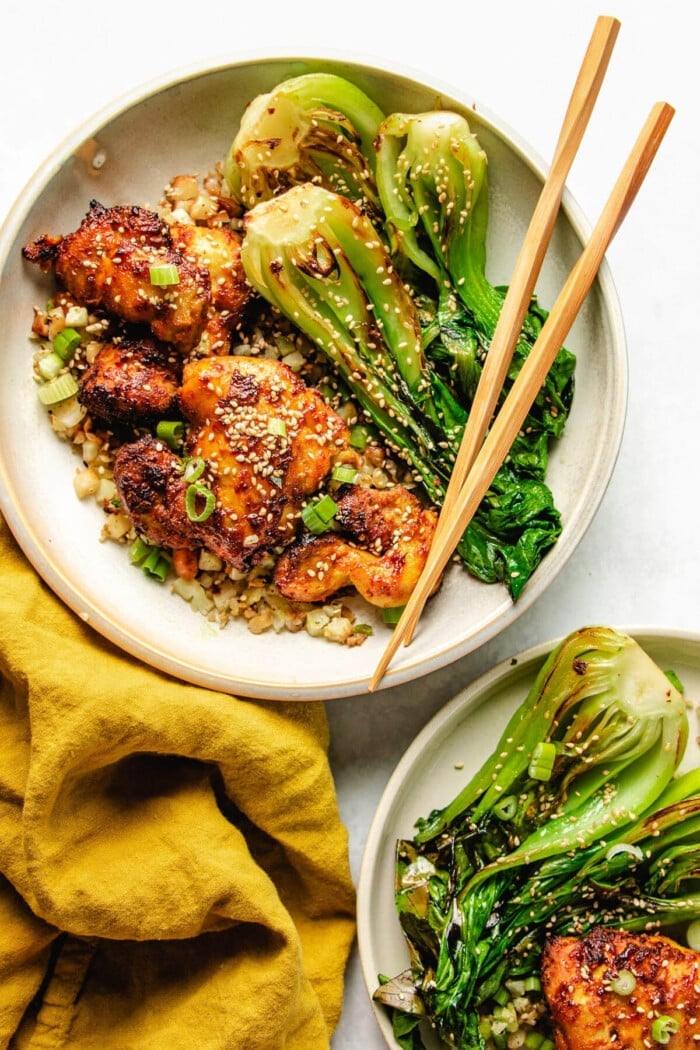
Crispy Rice Bibimbap is a bold fusion of a Korean rice bowl and TikTok’s crispy rice salad trend. It brings together the best of both worlds: fresh vegetables, crisp rice grains, and a savory, spicy-sweet gochujang sauce. Think of it as bibimbap with a crunchy twist.
This version is fast, easy, and so satisfying! I include shortcuts to steam and season the veggies quickly, and tips for achieving golden, crispy rice in the oven. The bibim sauce is gluten-free and perfectly balanced—smoky, a little spicy, and sweet.
⭐⭐⭐⭐⭐
How this version is easier
Traditional bibimbap bowl takes time because each vegetable is cooked and seasoned separately. It’s a lot of pots and pans! My method uses a one-pot steam to prepare all the veggies at once—no need to sauté anything. I also bake the rice instead of using a stone bowl or frying, which gives you that craveable crisp texture with way less effort.
How to make bibimbap salad with crispy rice
Using cooked and chilled rice will help save time and create the best texture for a crispy rice bowl. The vegetables are steamed in one pot for quick and easy prep—it’s simple from there!
Prep the veggies:
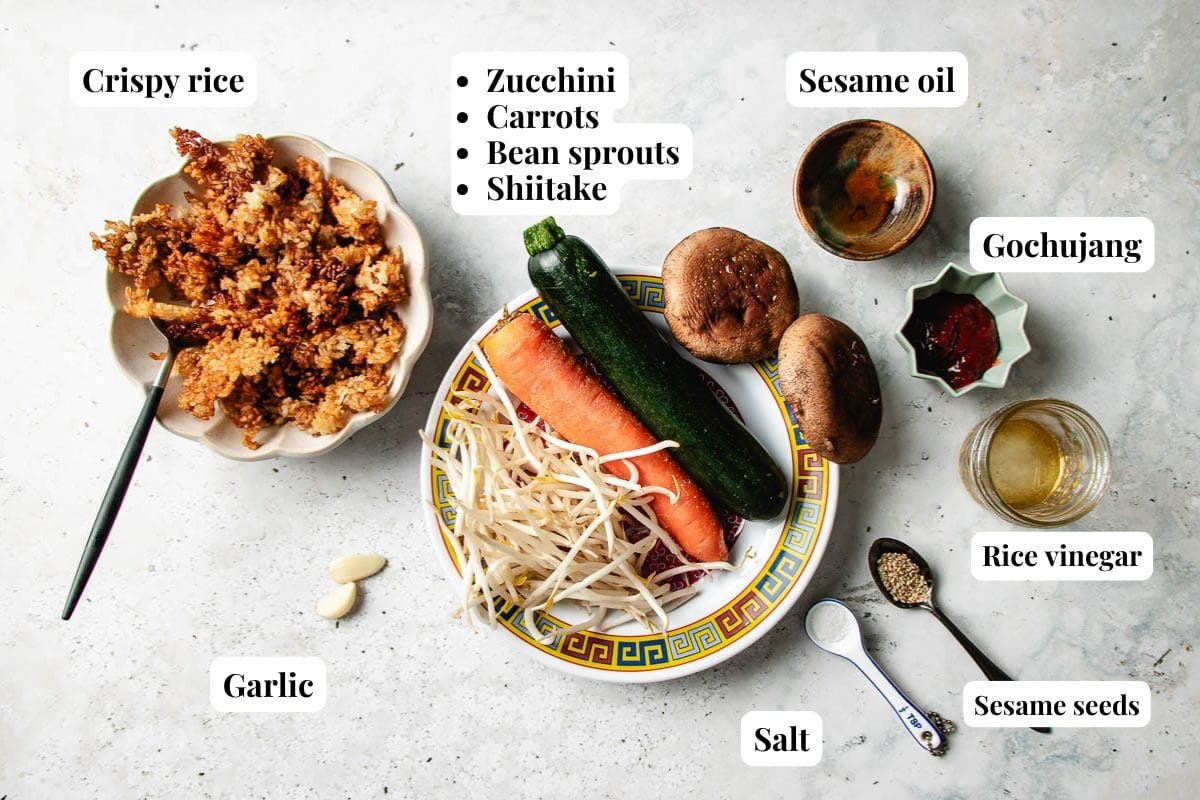
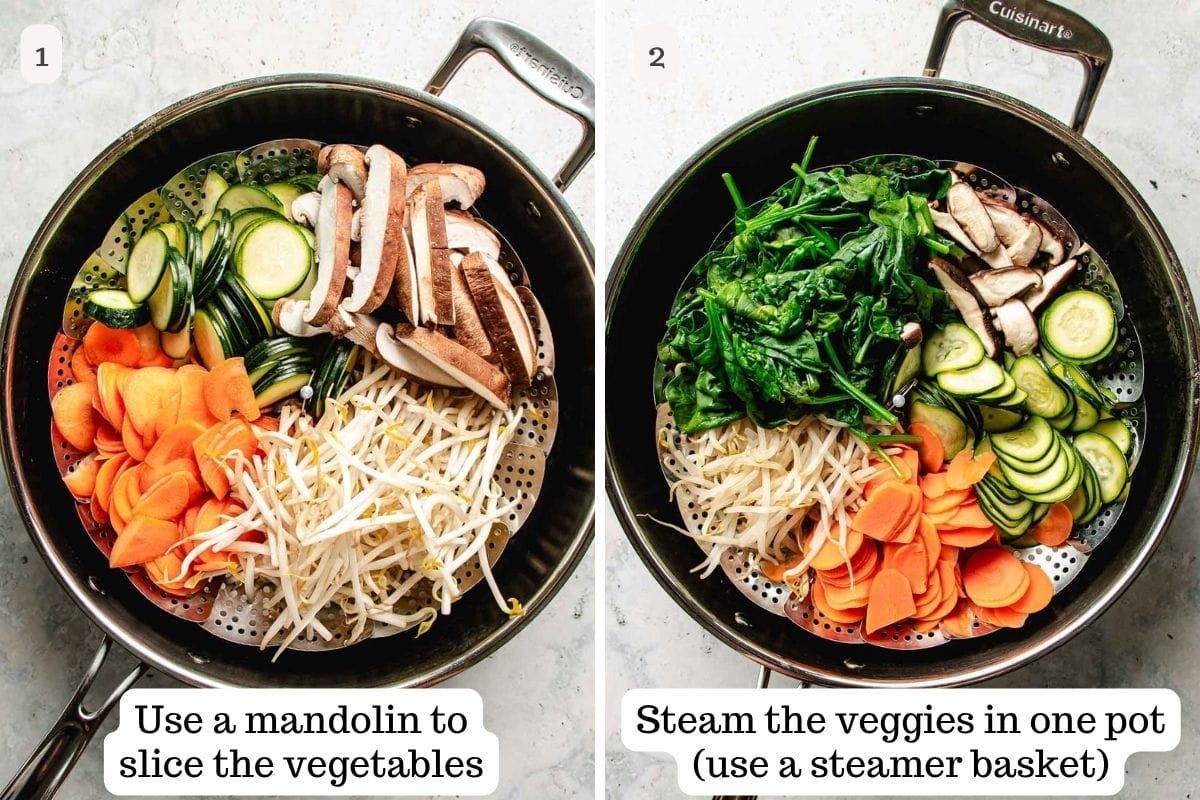
- Use a mandoline to thinly slice the zucchini and carrot. Uniform slices allow you to steam them at the same time—plus, it’s quicker and easier than hand slicing. Slice the shiitake mushrooms, and set aside the bean sprouts and baby spinach for steaming.
Steam the vegetables:
- Use a steamer basket! In my initial testing, I steamed directly in a shallow pot of water, and the veggies got too mushy. Steaming everything together is a huge time saver, and the basket helps deliver the crisp yet tender texture you want.
Make crispy rice in the oven:
- Cook and chill your rice ahead to save time. Short-grain white rice or Jasmine rice both work great. Chilling the rice removes extra moisture and helps the grains crisp up nicely in the oven. (Tip: Try my air fryer rice or check out my post on how to cook rice in a rice cooker.)
- Season the chilled rice with soy sauce, rice vinegar, and toasted sesame oil. This adds great depth of flavor and helps the grains brown evenly as they bake.
- Spread the rice in a thin, even layer on a sheet pan and bake for 15 minutes total —10 minutes, stir, then 5 more minutes to finish. The rice will continue to crisp up as it cools. Be careful not to overbake, or it may turn hard.

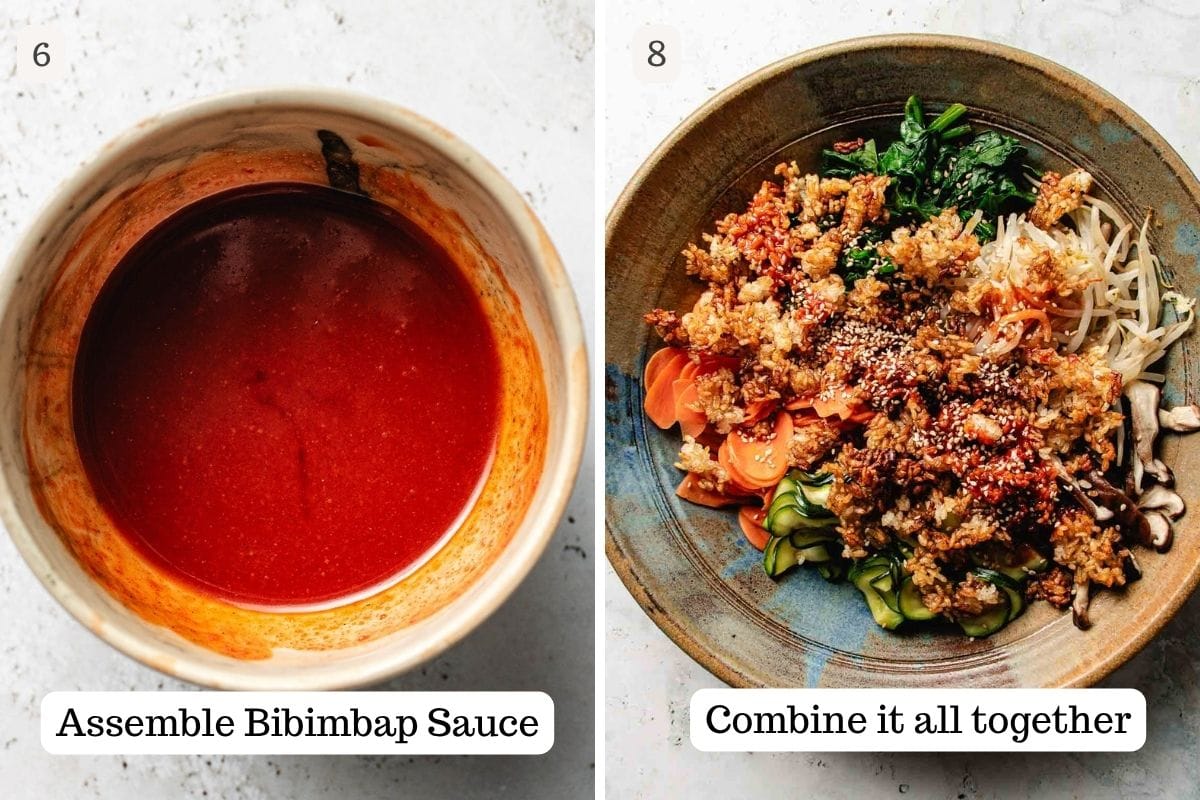
Bibimbap sauce:
- In a bowl, combine gochujang paste, toasted sesame oil, honey, and a splash of water. The sauce is smoky, savory, and just a little sweet. Adjust to your liking—add more water or honey to tone down the spice.
Season the vegetables:
- After steaming, let the veggies cool slightly. Squeeze out any excess liquid, then season with a bit of salt and grated garlic. Keep the seasoning light—remember, the sauce adds more flavor later.
Assemble:
- On a serving plate, layer the vegetables and sprinkle with toasted sesame seeds. Drizzle in half the sauce and a touch more sesame oil. Top with the crispy rice and gently mix. Serve right away so the rice stays crunchy!
- Optional toppings: Add a fried egg, bulgogi, or ground beef bulgogi for extra protein.
Topping variations
- Vegetable swaps: Choose vegetables that cook quickly but still hold their shape. Broccoli florets and shelled edamame are great options that add texture without turning mushy.
- Add extra protein: Bibimbap means “mixed rice,” so you can top it with any cooked protein you like. Try Orange-glazed salmon, Whole30 bulgogi, Honey garlic tofu, or Ground beef bulgogi—they all work beautifully as bibimbap toppings.
- Mix in Korean side dishes: Another fun way to customize your bowl is by mixing in banchan (Korean side dishes). Cucumber kimchi, Korean carrot salad, Korean cucumber salad, or Mung bean sprout salad are all great choices.
ChihYu’s helpful tips
- Use cold, day-old rice for the best crispiness. Fresh rice won’t crisp properly and might turn mushy in the oven. Loosen it gently before spreading on the pan.
- Don’t overcrowd the rice on the sheet pan. A thin, even layer with space between grains = better airflow and more crunch.
- Steam all the veggies together to save time. No need to sauté one by one—just layer in order of firmness and finish with spinach.
- Squeeze out excess water from veggies. This is key for flavor and texture. Too much liquid = soggy bowl and diluted sauce.
- Customize the bibimbap sauce to your taste. Our version is gluten-free and milder than traditional ones. You can add more honey or water to tone down the heat—or more gochujang if you like it spicier.
Try These Bibimbap & Crispy Rice Recipes Next
If you love this Korean rice bowl with crispy rice, here are some more ways to enjoy the bold Korean flavors and crunchy rice texture.
Crispy rice bibimbap recipe

Video
Ingredients
Bibimbap vegetables:
- 7.5 oz zucchini 1 large
- 5.3 oz carrot 1 medium
- 3.6 oz shiitake mushroom caps 3 large caps
- 5 oz bean sprouts
- 5 oz Baby spinach
- ½ tsp coarse sea salt
- 0.15 clove garlic grated, 2 tiny cloves
- 1 tbsp toasted sesame oil plus more for serving
- Sprinkle toasted white sesame seeds
- 3-4 whole fried eggs optional
For the crispy rice:
- 2 cups cooked rice short-grain white rice or Jasmine rice
- ¾ tbsp soy sauce
- 1 tbsp rice vinegar
- 2 tsp toasted sesame oil
Bibimbap sauce:
- 4 tbsp Gochujang paste
- 1 tbsp Toasted sesame oil
- 2-3 tsp Honey
- 2 tbsp Water
Equipment
- 1 Steamer basket (10.5 inch or larger in width)
Instructions
Prep the veggies:
- Gather the zucchini, carrot, shiitake mushrooms, bean sprouts, and spinach. Use a mandoline to thinly slice the zucchini and carrot into rounds. Slice the shiitake caps into long thin strips. Rinse the bean sprouts and drain well. Set aside the spinach for later.
Make crispy rice:
- Use cold or chilled cooked rice. It should be firm and no longer hot or wet. Preheat your oven to 400°F (200°C) on convection, or 425°F (220°C) if using a regular oven. Line a large sheet pan with parchment paper or a silicone baking mat to prevent sticking.
- Season the rice with soy sauce, vinegar, and sesame oil. Gently break up the rice with your hands so the grains are separated but not mashed. If the rice feels dry, drizzle with a touch of oil. Spread the rice into a thin, even layer on the sheet pan, leaving space between the grains for better airflow and crisping.
- Bake on the top rack for 10 minutes, then flip or stir the rice with a spatula. Bake for another 10 minutes, checking after 5 minutes, until the rice turns golden and crisp on most sides. Let it cool slightly—the rice will continue to crisp up as it cools.
Steam the vegetables:
- In a deep 14-inch stainless steel pan, add 1 cup of water and place a steamer basket inside. Layer in the carrots, zucchini, shiitake, and bean sprouts. Cover with a lid and bring to a simmer over medium heat. Once steam starts escaping from the lid (about 8 minutes), reduce the heat to low and steam for 4 minutes. Open the lid and use chopsticks to lightly toss the vegetables for even cooking. Add the spinach on top, cover, and steam for 1 to 2 more minutes until just wilted. Remove the lid and let the vegetables cool until they’re safe to handle.
Bibimbap sauce:
- In a small bowl, mix together the gochujang, sesame oil, honey, and water. Stir until smooth and well combined. Set aside.
Season the vegetables:
- Once the steamed vegetables are cool to the touch, transfer them to a colander placed over the sink. Gently squeeze out excess water using your hands. Move the drained vegetables to a large mixing bowl. Season with salt, grated garlic, and sesame oil. Toss everything together and taste—keep it slightly under-seasoned since the bibimbap sauce will add more flavor later.
Assemble:
- Transfer the seasoned vegetables to a large serving plate. Sprinkle with toasted sesame seeds and drizzle in about half the bibimbap sauce and a touch more sesame oil. Save the rest for serving. Top everything with the crispy rice and gently toss to combine. Serve immediately while the rice is still crisp.
- Optional: Add fried eggs, bulgogi, or bulgogi ground beef for extra protein.
Notes
- Serving ideas: Top with bulgogi ground beef, a fried egg, tofu puffs, or even gochujang-glazed salmon for extra protein and flavor.
- Quick tip for cooling veggies: To cool down the steamed vegetables faster, rinse them briefly under cold tap water. Just be sure to squeeze out the excess liquid before adding seasonings.
- Make-ahead tips:
- The crispy rice can be made 2 to 3 days in advance. Store in an airtight container lined with a clean paper towel to absorb moisture. It tastes great cold—no need to reheat!
- The bibimbap sauce can be made up to 1 week ahead. If it thickens in the fridge, just stir in a splash of water.
- You can also steam and slice the vegetables 1 to 2 days in advance. After steaming, squeeze out any extra liquid, season them, and store in the fridge.
- Storage: Keep each component—crispy rice, bibimbap sauce, and seasoned vegetables—stored separately. Only combine what you plan to serve to keep the rice crunchy.
- Gluten or soy-free gochujang option: Use a store-bought gluten-free gochujang or my Paleo gochujang as needed.
Nutrition
Nutrition information is automatically calculated, so should only be used as an approximation.
Made a dish and loved it? Please rate the recipe and leave a comment in the section below! It helps my blog grow organically, allowing me to continue sharing free and awesome content with you. Thank you!


I’ve made this twice now with my family and it’s become one of our favorites. We love how the rice ratio is swapped with the veggies so it’s less carb heavy. We do end up baking our rice a little longer to make it extra crispy and we add trader joes frozen bulgogi for a quick and flavorful protein add.
Lovely! What a semi-homemade version. Perfect! :))
I love your recipes, thank you
Thank you so much. You are so sweet! Let me know what you’d like to see more of and I’m happy to create more! 🙂