This post may contain affiliate links. Please read our disclosure policy.
Crispy rice is super popular right now—and for good reason! Whether you want golden-crunchy squares for sushi toppings (like my crispy rice sushi) or crispy grains to sprinkle on bowls and salads (like this crispy rice bibimbap salad), I’ve got you covered.
In this post, I’ll walk you through two easy methods to make crunchy rice at home—pan-fried squares and oven-baked crispy bits. Both versions are crisp outside, a little chewy inside, and full of flavor from simple Asian sushi rice seasonings.
Quick look at the recipe
Here’s a quick look at what you’ll find in this recipe:
- Two easy techniques: Learn how to make crispy rice patties (perfect for an appetizer or crunchy rice sushi) and crispy grains of rice (as a crunchy topping for salads and bowls).
- Use cooked or leftover rice: Freshly cooked rice is best for rice cakes. Leftover rice is perfect for crispy grains.
- Choose your cooking method: Air-fry, oven, or stovetop — whichever suits your needs.
- Naturally gluten-free: Made with simple ingredients and easy to season your way.
- Solves common mistakes: Built-in tips to prevent soggy rice, burning, or sticking—so every batch comes out golden and crunchy.
How to make crispy rice (2 ways)
Two techniques that deliver restaurant-style texture at home — choose the style that fits your mood and meal! Both start with properly cooked rice. Sushi style rice seasonings add tangy-umami flavor and help the rice brown. For the full recipe, scroll down to the recipe card.
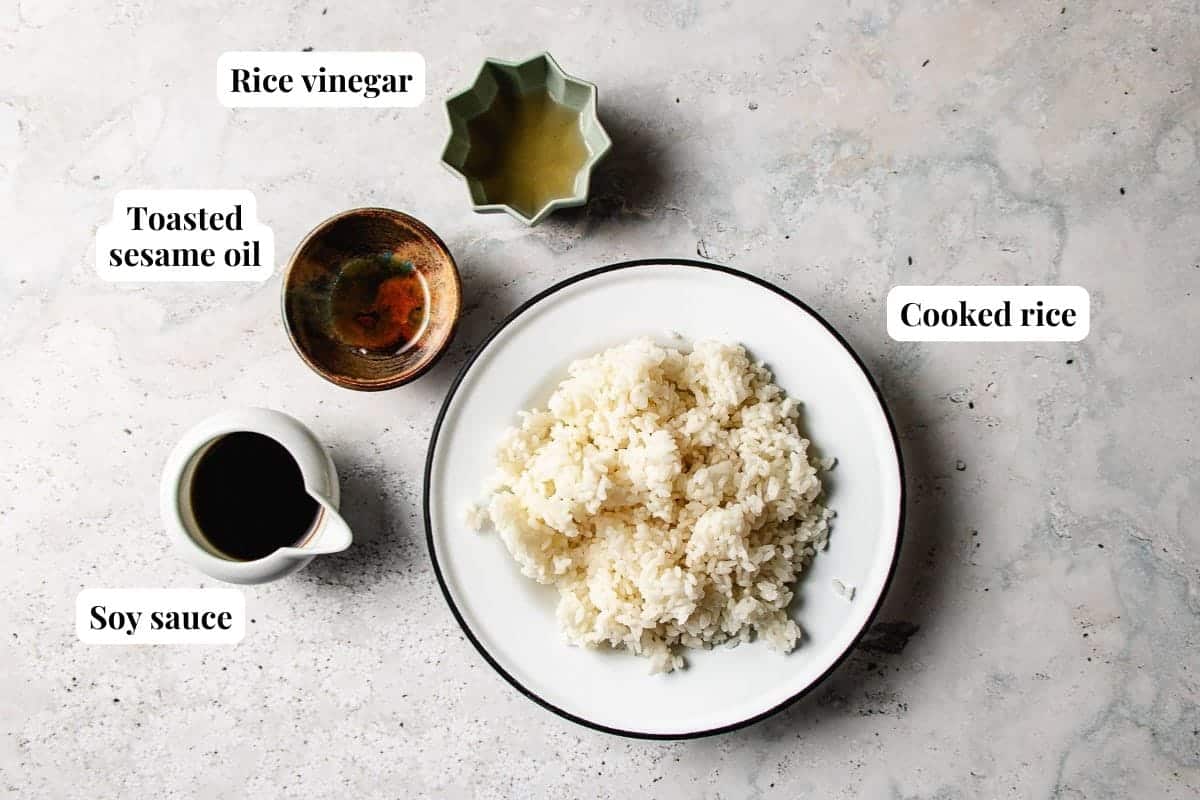
Step 1: Cook and season the rice
Short-grain white rice (sushi rice) works best. Its higher starch content helps the rice hold together and develop a chewy-crisp texture once cooked and chilled.
While the rice is hot, season it with soy sauce (or coconut aminos), rice vinegar, and toasted sesame oil.
Tip: For perfectly cooked rice, don’t miss my guide for cooking rice in a rice cooker.
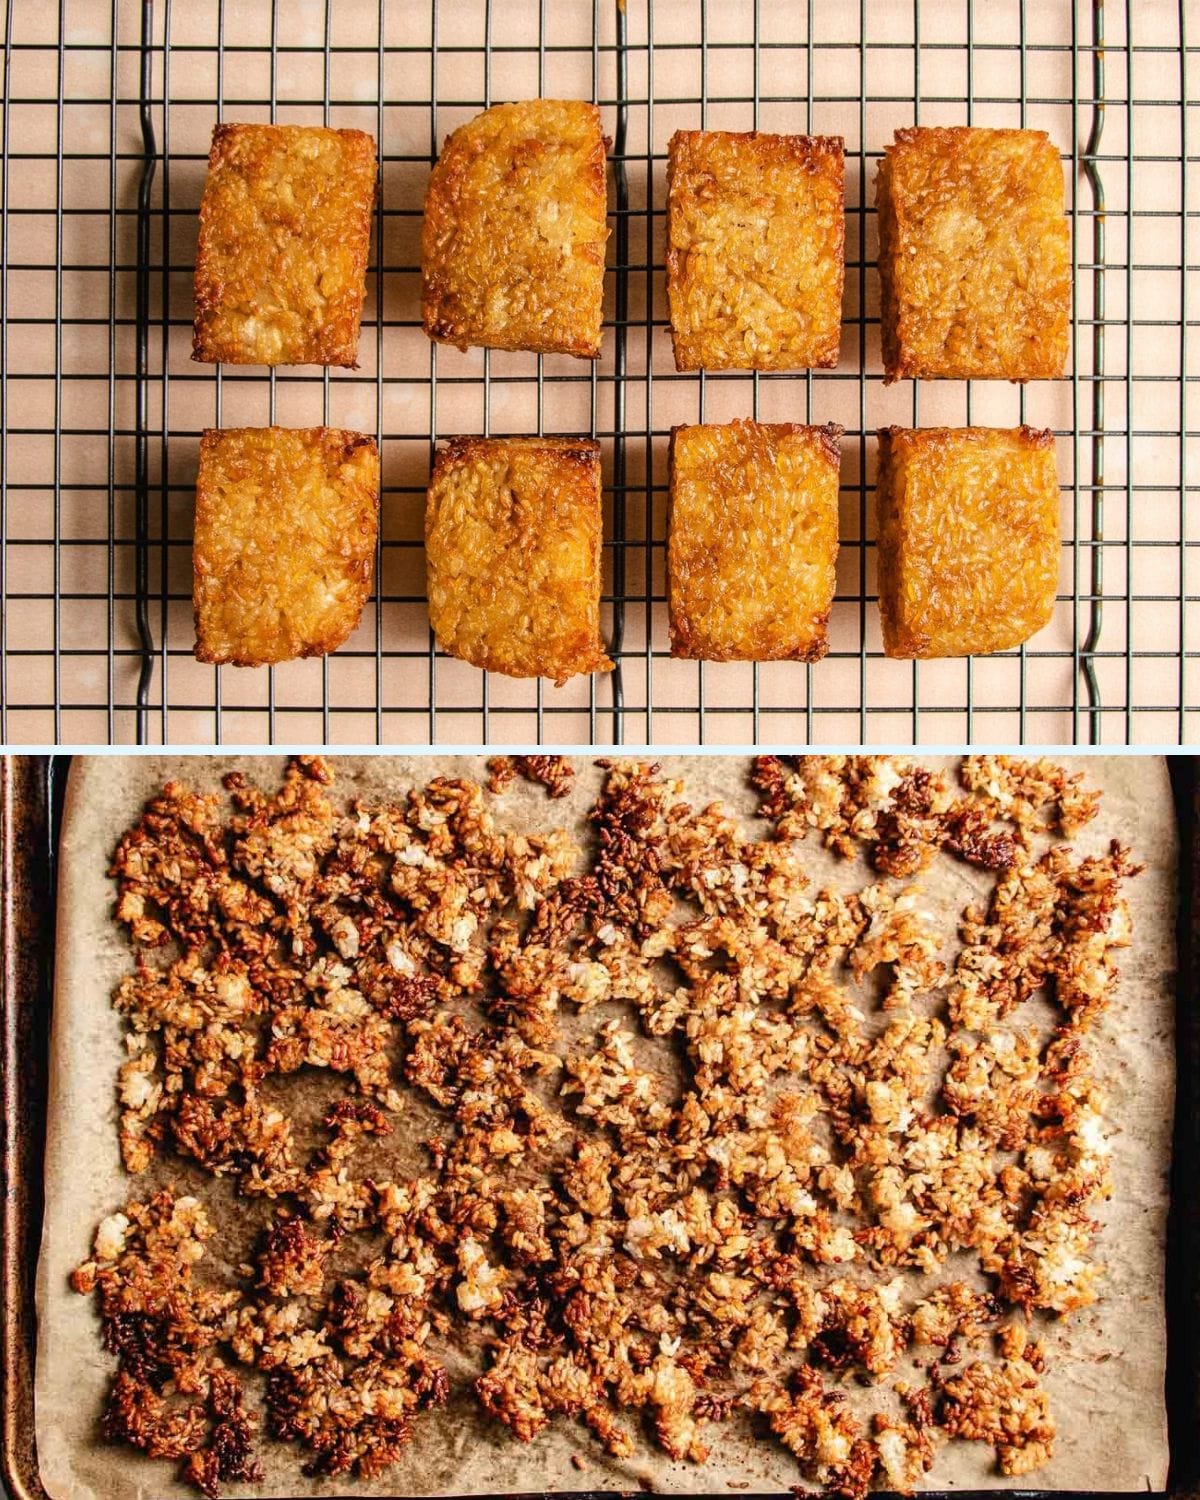
style 1: Crispy rice squares (perfect for sushi)
- Shape and Press (Use warm, freshly cooked rice): Press the warm rice into an even layer about ½-inch thick in a dish or tray lined with cling wrap. Use a rice paddle, spatula, or the back of a spoon to press firmly, especially around the edges. Chill overnight or freeze slightly to firm it up.
- Cut into Squares or Rectangles: Once firm, lift the rice from the dish using the plastic wrap. Place it onto a damp cutting board and slice into bite-sized rice cubes.
- Pan-Fry or Air-Fry:
- Pan-fry over medium heat until golden and crispy, flip once.
- Air-fry at 400°F (205°C) for 8–10 minutes, flipping halfway.

Style 2: Crispy rice bits (for salads and crunchy toppings)
- Break Up Cooked Rice (Use chilled rice): Gently break up the rice with your hands into loose clumps. Spread it out on a parchment-lined sheet tray in a thin, even layer. Leave space between grains to allow airflow and even crisping.
- Bake until golden: Preheat a convection oven to 400°F (200°C) or a regular oven to 425°F (220°C). Bake until crispy, about 15-20 minutes total, tossing once halfway.
- Let cool: Let the baked rice cool for a few minutes—this helps it firm up and get even crunchier.

Serving Ideas and Toppings for Crunchy Rice
So trendy on TikTok right now, the crispy rice bites are perfect for sushi, as a party finger food, or a delicious gluten-free snack. Top them with your favorite protein and sauce! The crispy grains are a tasty and healthy way to add texture and crunch to any dish.
Topping ideas for crunchy rice bites:
- Perfect for toppings such as spicy tuna, spicy salmon, smoked salmon, avocado slices, paleo Napa cabbage kimchi, Asian pickled cucumbers, or spicy crab.
How to use crunchy rice grains:
- Sprinkle over salads, poke bowls, spicy tuna rice bowls, or even use as a crunchy sweet corn gazpacho topper.
ChihYu’s expert tips
- Use a nonstick pan for pan-frying. It prevents sticking and helps the rice release cleanly.
- Chill the rice to dry it out. Cold, dry rice crisps up better and won’t stick to the pan.
- Don’t overheat the pan or air fryer. High heat burns the rice before it crisps — medium or moderate heat works best.
- Press rice while it’s still warm (for rice cakes). Warm rice sticks together better, making it easier to mold and slice without falling apart.
- Keep rice cakes about ½ inch thick. Thinner cakes crisp more evenly and stay chewy in the center without becoming too hard.
- Enjoy right away for the crispiest texture. If you do make this recipe in advance, reheat your rice cakes or grains in a skillet before serving.
Troubleshoot
Your pan might not be nonstick, or the rice was too wet. Use a nonstick skillet and make sure the rice is chilled and dry before frying.
The rice likely has too much moisture. Chill it first so it dries out — this makes it easier to get crispy.
The heat is probably too high. Use medium heat for pan-frying and check oven or air fryer temps — it should crisp gradually, not char.
You may not have pressed them firmly while the rice was still warm. Always shape and compress the rice while hot so the grains stick together.
It might be overcooked, or the rice cakes may be too thick. Stick to ½-inch thickness and avoid over-frying or baking.
Try these recipes using crispy rice next!
Crispy Rice recipe
Video
Ingredients
Rice:
- 8.64 oz short grain white rice 1.5 rice cooker cup
Rice seasonings:
- 2 tbsp coconut aminos or ¾ tbsp soy sauce
- 1 tbsp rice vinegar
- 2 tsp toasted sesame oil
Cooking oil:
- Avocado oil or any neutral-flavored oil (for frying or spraying)
Instructions
Cook the rice:
- Rinse the rice 3–4 times until the water runs mostly clear. Cook the rice in a rice cooker. (See my full guide on cooking rice in a rice cooker.)
- Season the rice: While the rice is hot, season it: Add the coconut aminos (or soy sauce), rice vinegar, and sesame oil. Gently fold to combine.
- From here, pick your style:
Style 1 – Crispy rice squares:
- Line a Mold: Line an 8×8-inch (20×20 cm) square baking dish with cling wrap.
- Shape and Press: While the rice is still warm, add it to the dish. Press it down firmly using a rice paddle or the back of a spoon into an even layer, about a little thicker than ½ inch (1.27 cm) thick..
- Tip: Pay extra attention to the corners and edges — those are usually where the rice falls apart. You can gently lift the edges of the plastic wrap and fold them over slightly to help press the grains in and pack everything more tightly.
- Chill: Once pressed and cooled to room temperature, cover and refrigerate overnight to firm up.
- Slice into Squares: Lightly wet a cutting board and your knife. Lift out the rice block, remove the cling wrap, and slice into about 10 rectangular pieces.
- To Air fry: Preheat air fryer. Spray the basket with oil. Lightly spray the rice pieces and place oiled-side down in the basket, leaving space between each. Air fry at 380°F (193°C) for 8 minutes. Spray again, flip, and air fry for another 8 minutes until golden and lightly crispy. Cool them down over a baking rack.
- To pan fry: Preheat a non-stick skillet over medium heat. Add 3–4 tbsp oil. Add rice squares, leaving space between them. Pan-fry for about 4 minutes until golden, then flip and fry another 3–4 minutes. Add more oil as needed. Transfer to a wire rack to cool and crisp.
Style 2 – Crispy rice grains:
- Cool or chill the rice: Let freshly cooked rice cool completely or chill overnight to dry out a little (for better crisping).
- Preheat your oven to 400°F (200°C) on convection (or 425°F | 220°C if using a regular oven). Line a large sheet pan with parchment or silicone baking mat so that the rice grains won’t stick to the pan.
- Break up the chilled rice: Loosen the rice gently with your hands so the grains are separated but not smashed. Drizzle with a little oil if it feels dry.
- Spread out: Spread the rice into a thin, even layer on the pan. Leave some space between grains for better airflow and even crisping.
- Bake on the top rack for 10 minutes, then flip or stir the rice with a spatula.
- Bake for another 10 minutes, check after 5 minutes or until the rice is golden and crisp on most sides.
- Let cool for a few minutes. The rice will crisp up even more as it cools.
Notes
- What type of rice is best?
- For crispy rice squares, use short-grain white rice (sushi rice). It’s soft and starchy, which helps it hold together.
- For crispy rice grains, any type of rice works — jasmine, long grain, even brown — depending on your texture preference.
- Can I use leftover cooked rice?
- For crispy rice grains: Yes! Leftover rice is perfect. Just break it up, season, and bake until golden and crispy. You’ll need 471 gram (about 2 cups of cooked rice) to make 1 cup of crispy rice grains.
- For crispy rice squares: No. You need freshly cooked, hot rice to press and mold the cakes properly. Chilled or leftover rice won’t stick together well and will crumble.
- Do I need to chill the rice first?
- For rice squares: Mold and press the rice while it’s still warm, then chill to set the shape.
- For rice grains: Let the rice cool and chill it before baking — this helps the grains dry out and crisp better.
- Different rice seasonings: Keep it simple with just oil and salt, or go with sushi-style rice seasoning (vinegar, sugar, sesame oil). You can also add garlic granules or chili powder for extra flavor.
- What texture should I aim for? I like mine crispy on the outside, soft and chewy inside. If the rice gets too crunchy, it will be hard to chew. A light crisp is perfect!
- Make-ahead: Cook, season, and shape the rice ahead of time. Chill overnight to set the shape and make it easier to crisp the next day.
- Storage & Reheat:
- Crispy rice grains: Store in an airtight container in the fridge for 2–3 days. To reheat, sprinkle with water and microwave on low for 30 seconds.
- Crispy rice squares: Best enjoyed fresh. If needed, reheat in a skillet over medium-low heat until warmed through.
Nutrition
Nutrition information is automatically calculated, so should only be used as an approximation.
Made a dish and loved it? Please rate the recipe and leave a comment in the section below! It helps my blog grow organically, allowing me to continue sharing free and awesome content with you. Thank you!