This post may contain affiliate links. Please read our disclosure policy.
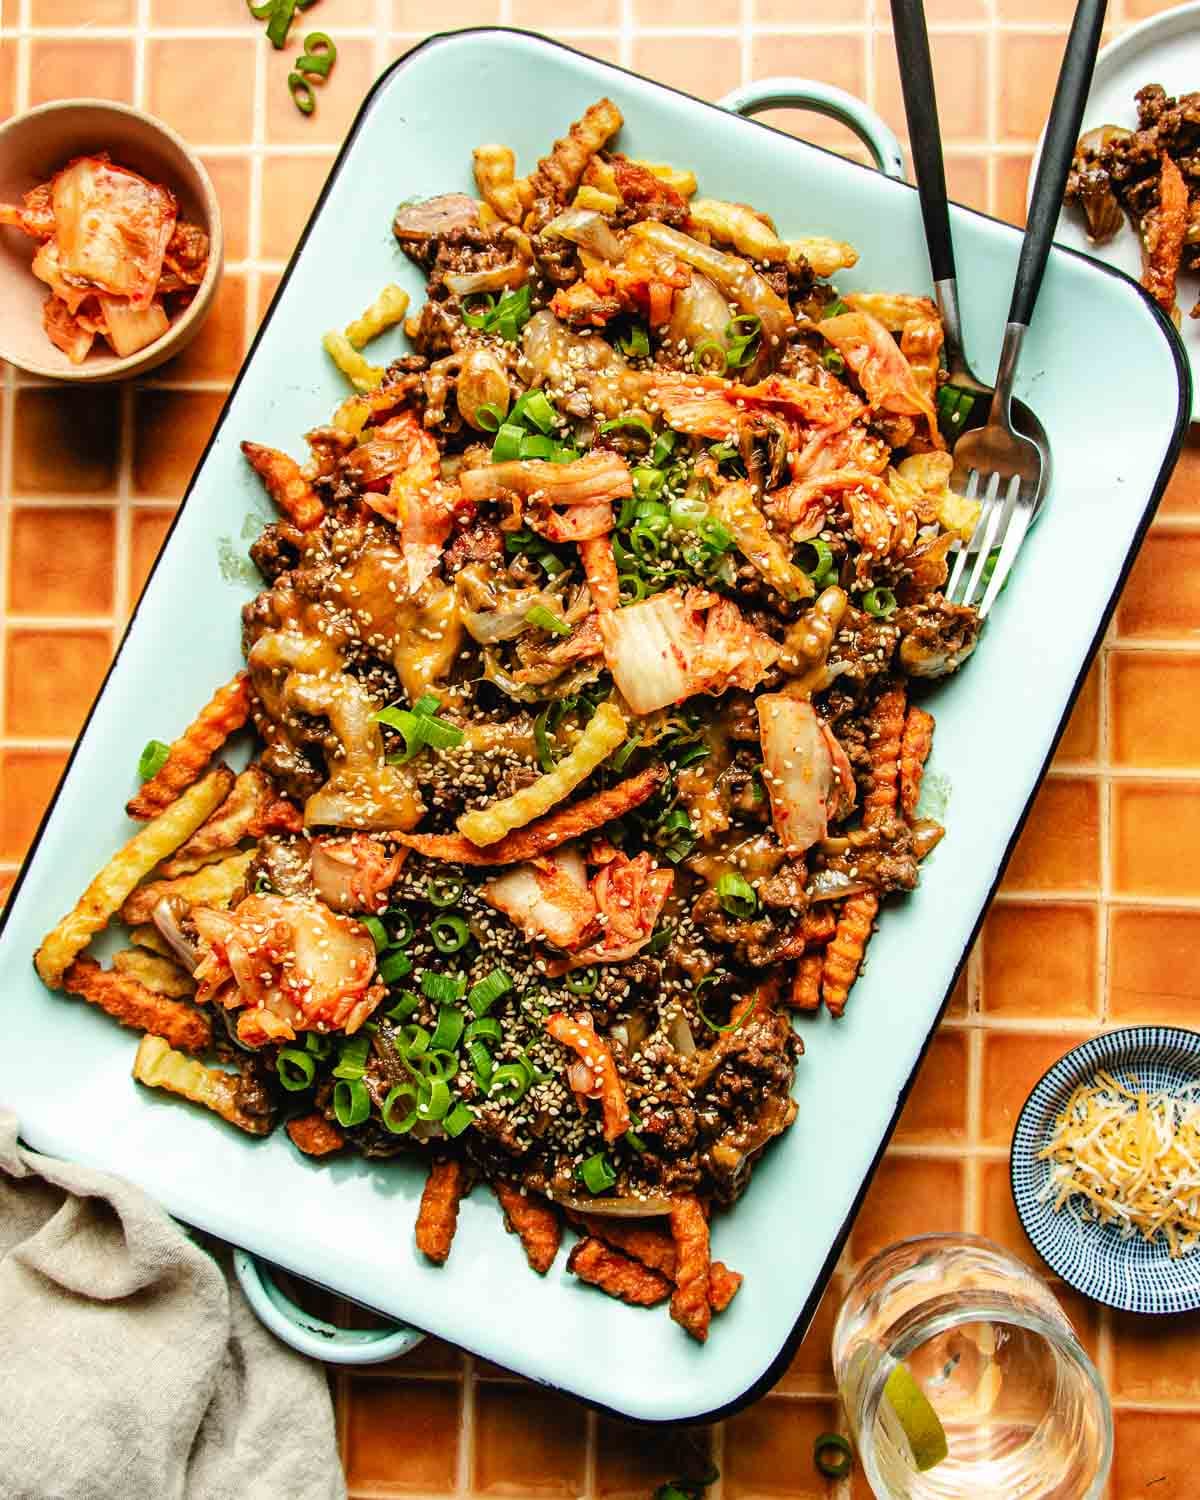
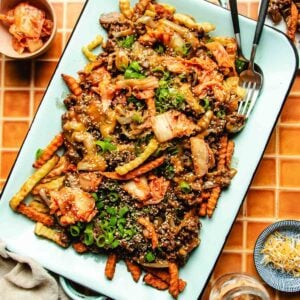
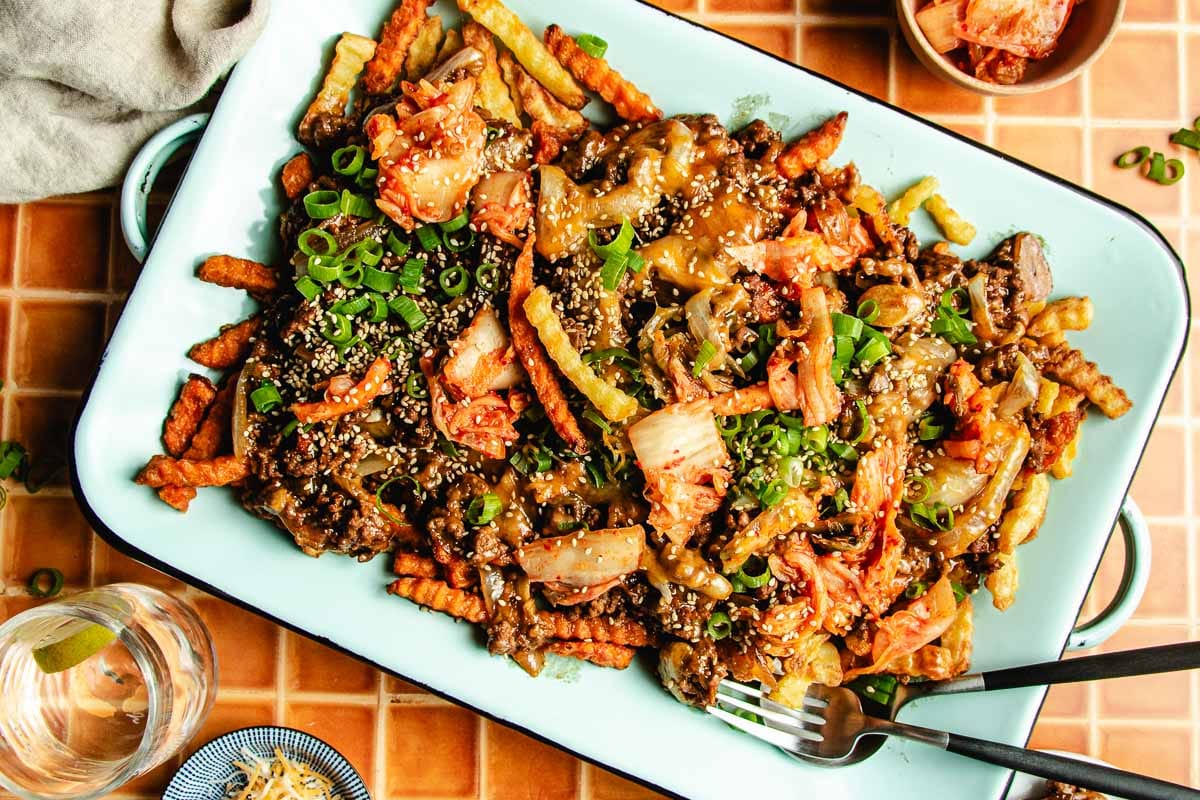
If you’ve never had bulgogi fries before, think of them as a Korean-inspired take on loaded fries. Crispy fries are topped with savory bulgogi-style beef, melted cheese, and fresh toppings like kimchi for balance. They’re fun, comforting, and easy to share — the kind of dish that disappears fast once it hits the table.
Why These Korean Loaded Fries Work

I created this dish to be fun and easy to share with family and friends—especially for game day or larger gatherings. The goal was bold, savory flavor and crispy texture, without extra prep or fussy steps.
- Easier and faster to make:
Using ground beef means no slicing or marinating. It cooks quickly, absorbs flavor fast, and keeps the recipe simple and flexible. - A quick bulgogi-style sauce that delivers flavor:
The sauce does the heavy lifting, bringing savory-sweet bulgogi flavor straight to the pan without the need for advance marinating. - Built for sharing with a crowd:
The beef can be made ahead, fries baked fresh, and everything assembled right before serving—easy to scale and easy to serve hot.
Main Ingredient Notes
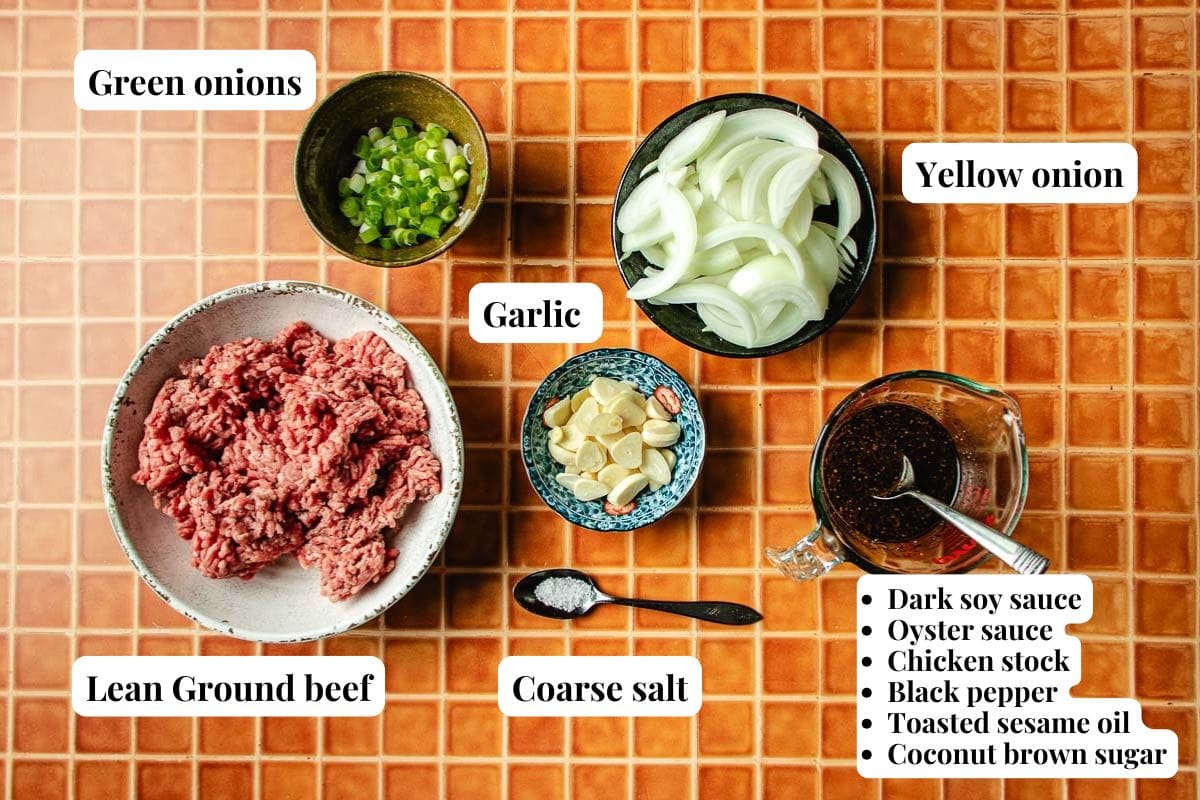
- Ground beef: Use 90% lean ground beef for the best balance of flavor and texture. It cooks up rich without releasing too much grease, which helps keep the fries crisp. Grass-fed is great if you have it.
- Bulgogi sauce: This is a quick bulgogi-style sauce made with dark soy sauce, oyster sauce, chicken stock, black pepper, toasted sesame oil, and coconut brown sugar. The flavor is savory-sweet, balanced, and not overly heavy.

- Cheese: A mix of shredded cheddar and Monterey Jack melts quickly and evenly.
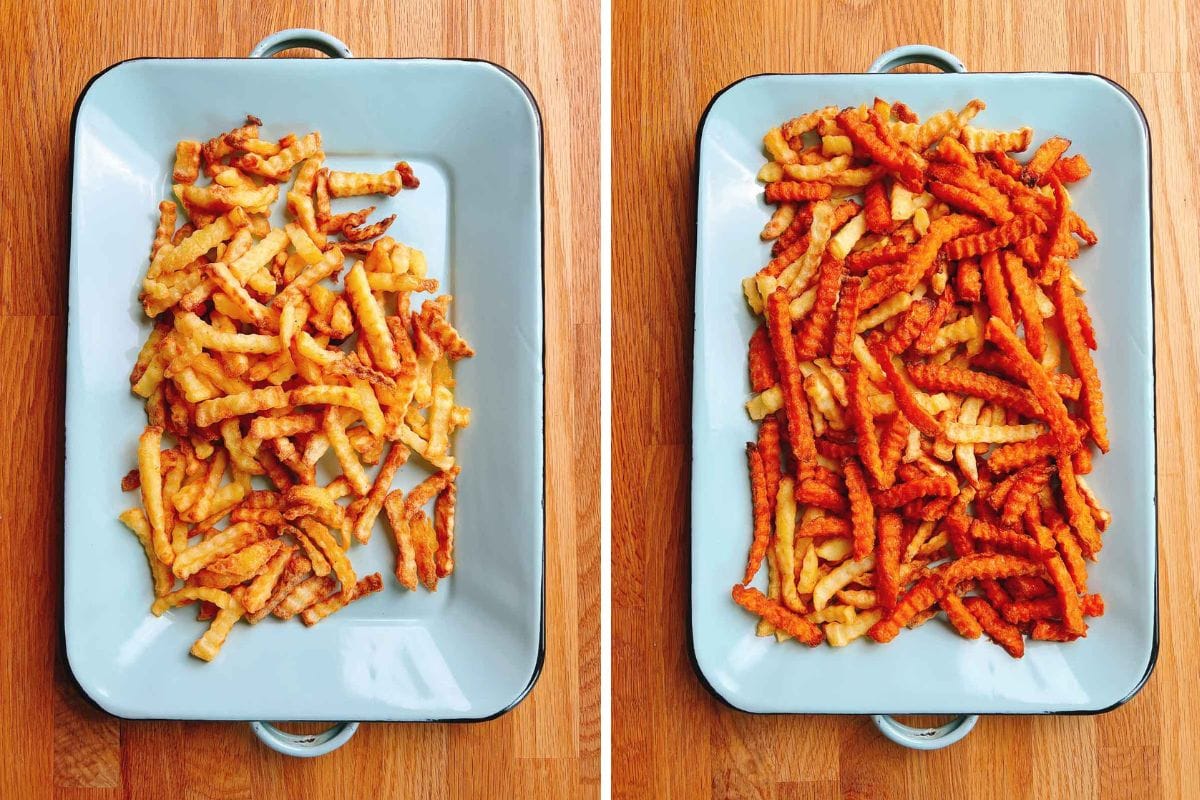
- Fries: Frozen fries work best since they’re already pre-cooked and crisp up easily in the oven. I like crinkle-cut fries for extra texture and often use a mix of regular and sweet potato fries. Vegetable fries are softer and don’t crisp as well.
- Toppings (kimchi): Napa cabbage kimchi adds freshness and contrast to balance the rich beef and cheese. It brightens the dish without needing extra sauces.
Tips for the best bulgogi loaded fries
After testing this recipe over and over, I found that bulgogi fries usually fail for the same few reasons. Here’s what to watch out for and how to keep your fries crisp, balanced, and game-day ready.
How to Keep the Fries Crispy
The key to keeping bulgogi fries crispy is timing.
- Time things well: Don’t let fries sit around waiting for the beef, and don’t let the beef sit around waiting for fries. Aim to finish them close together so everything is hot.
- Balance also matters. Bulgogi should be treated as a topping, not the main bulk of the dish. Using more fries and less beef helps the fries stay crisp and keeps the dish from feeling heavy.
Keeping Korean Fries Balanced (Not Greasy)
Loaded fries can feel greasy if the beef releases too much fat or moisture.
Two things help prevent that:
- Use lean ground beef (90% lean).
- Before adding the bulgogi sauce, either cook down the moisture in the pan or drain off excess fat.
Serving The Fries for Game Day or a Crowd
For larger groups, prepare in components instead of a fully assembled dish.
- The bulgogi beef can be made ahead, but don’t add the cheese yet.
- When you’re ready to serve, reheat the beef on the stovetop, add the cheese and let it melt.
- Bake the fries fresh, then combine everything right before serving.
Bulgogi Fries Recipe
Video
Ingredients
Bulgogi ground beef:
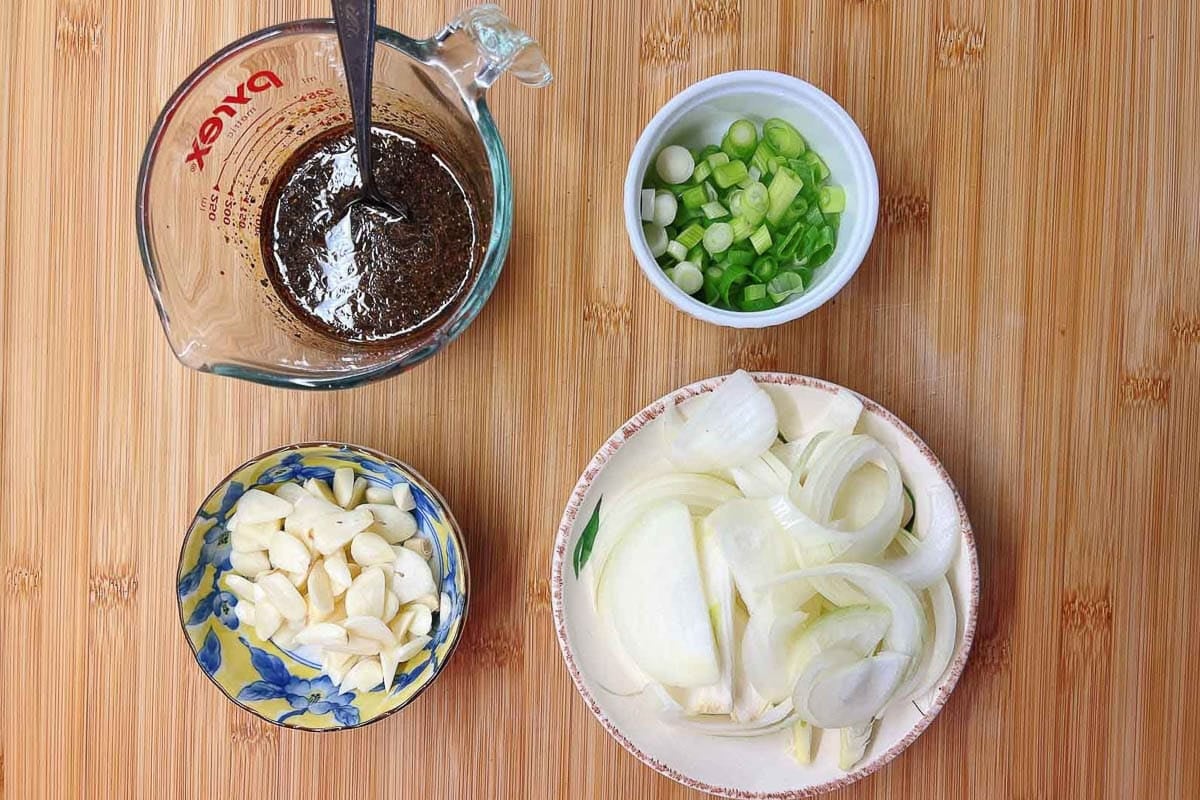
- 6 oz yellow onion thin sliced (about ½ large onion)
- 1 oz garlic cloves thin sliced (about 7 large cloves)
- 3-4 green onions
- 1 tbsp avocado oil
- 1 lb ground beef 90% lean
- ½ tsp coarse sea salt
- Splash Chinese cooking wine dry sherry, or gluten-free cooking sake
Bulgogi Sauce:
- 2.5 tbsp dark soy sauce
- 1 tbsp oyster sauce
- 3 tbsp chicken stock
- ⅛ tsp freshly ground black pepper
- ½ tbsp toasted sesame oil
- 1 tbsp coconut brown sugar
Slurry:
- 1 tbsp tapioca starch or potato or arrowroot
- 3 tbsp water
Other:
- 8 oz shredded cheddar and Monterey Jack cheese or more, to taste
- 32 oz frozen fries of your choice
- Napa cabbage kimchi for serving
- Sprinkle Toasted white sesame seeds
- Sprinkle Gochugaru flakes optional
Instructions
- BEFORE YOU START: This recipe makes more bulgogi than fries by design. The dish is best with more fries and less beef, so save the extra bulgogi for other meals, such as rice bowls.
- Prep the aromatics: Thinly slice the onion and garlic. Dice the green onions into small rounds and separate the white and green parts. Set aside.

- Assemble the bulgogi sauce and slurry: Assemble the bulgogi sauce in a bowl (from dark soy sauce to coconut sugar). Stir well. In another small bowl, combine the starch and water to make the slurry.
- Crisp up the fries: Bake the fries according to the package instructions until crisp. Time this so the fries finish close to when the beef is ready, keeping them warm and crisp for assembling.
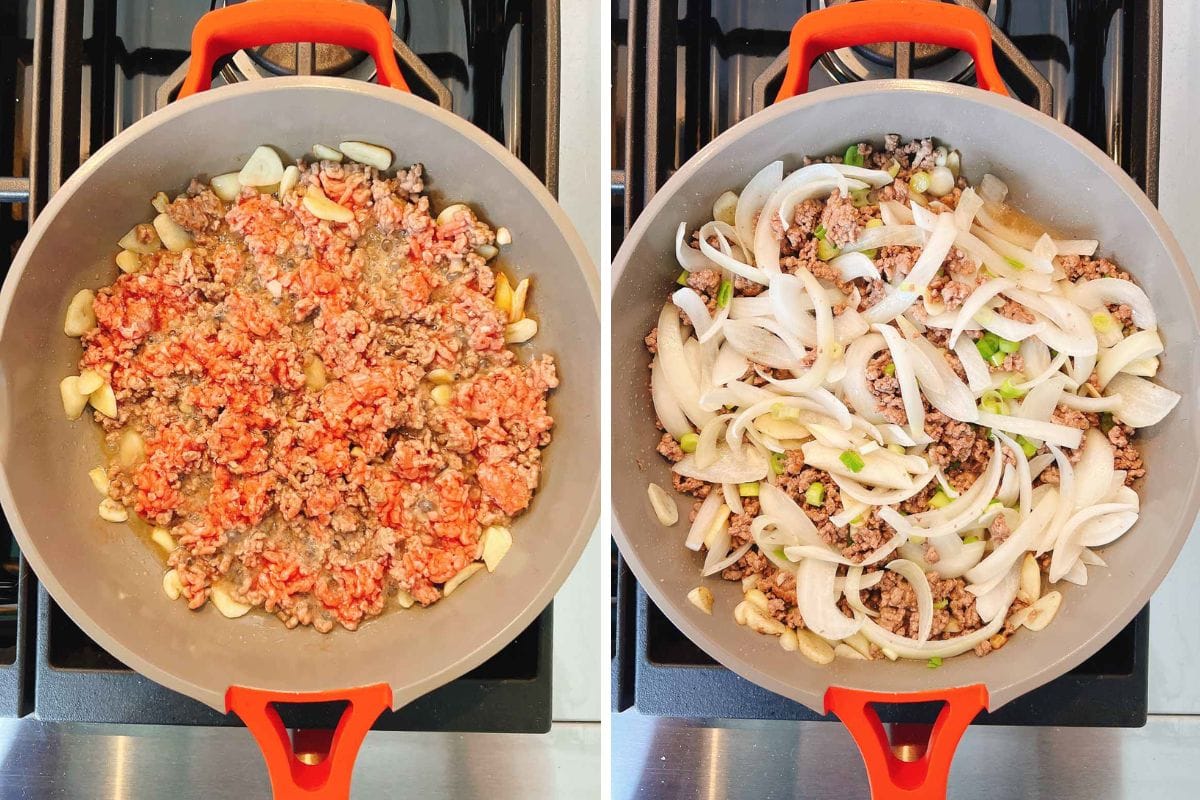
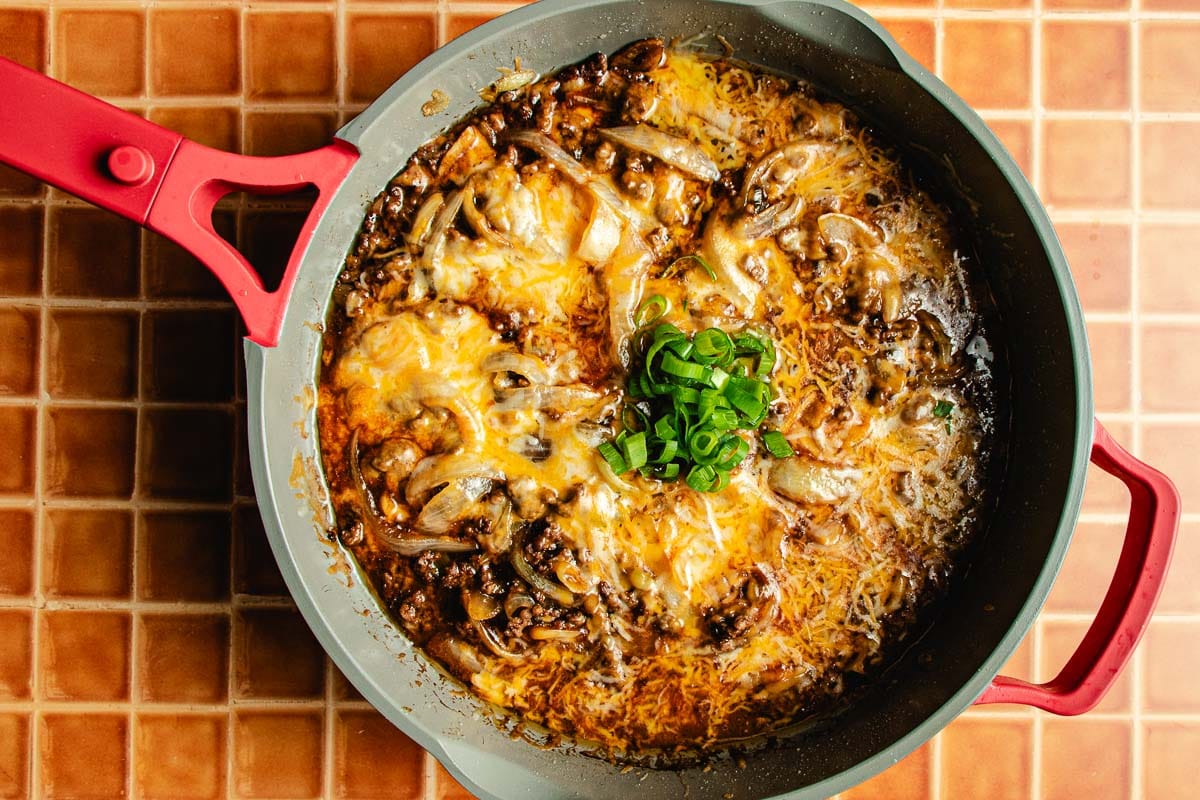
- Brown the beef: In a large (12-inch) sauté pan, preheat over medium heat until it feels quite warm. Add the oil and sliced garlic. Sauté quickly for 5 to 6 seconds. Add the ground beef and use a wooden spoon to break it into smaller bits. You should hear a sizzle—if not, increase the heat slightly. Season with salt and cook over medium heat for 3 minutes.
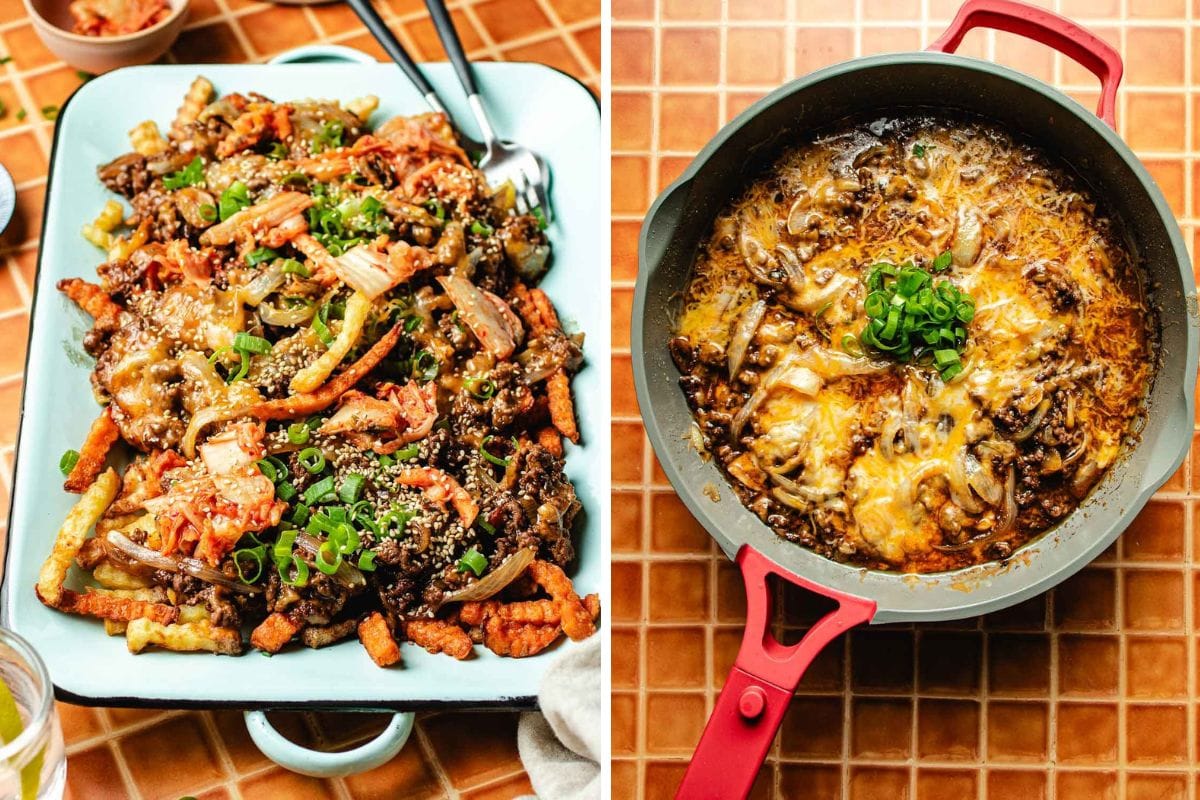
- Add onions and scallions: While the beef is still slightly pink, add the onion and continue sautéing until the beef is no longer pink, the meat is broken into finer bits, and the onion becomes soft and slightly translucent, about 2-3 minutes. Add the white scallion parts and a splash of cooking wine. Keep stirring and sauteing for another 3 minutes to reduce the moisture in the pan so that the meat is not too wet.
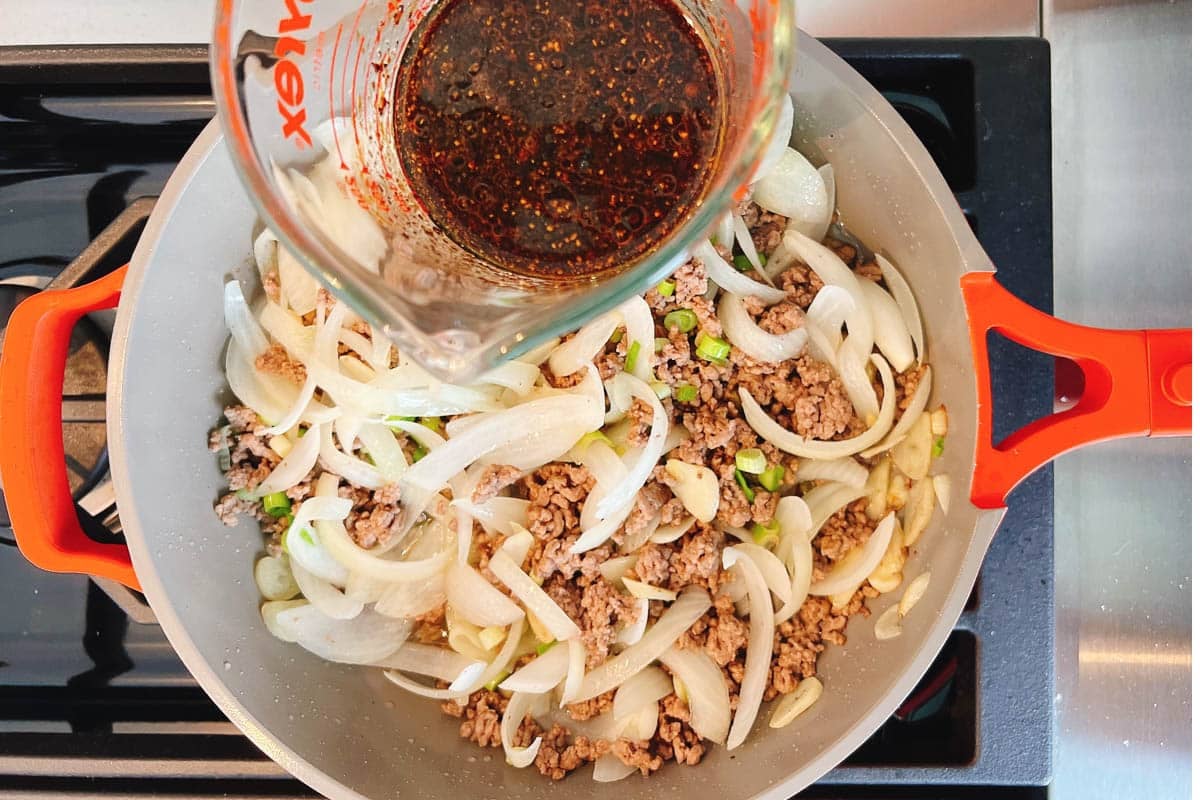
- Add sauce and thicken: Once the pan is no longer too watery, pour in the bulgogi sauce and distribute evenly. Stir the slurry again before adding it to the pan. Stir for about 30 seconds to thicken.
- Add cheese: Sprinkle in the cheese. Cover the pan and simmer over medium to medium-low heat until the cheese is melted, about 3 minutes.
- Assemble and Garnish: Transfer the fries to a large serving plate. Spoon the bulgogi over the fries, using only the amount you need. Save the extra beef for later. Garnish with scallion greens, sesame seeds, and kimchi. Serve immediately.
- Recommendation: Combine the beef and fries right before serving (and only the portion you plan to eat) to keep the fries crisp.
Notes
- Reduce moisture: Cooking off excess moisture from the ground beef helps keep the bulgogi from becoming too wet, which is important so the fries stay crisp.
- Less fat: Ground beef naturally releases fat. If you prefer a lighter dish, drain off some of the fat before adding the bulgogi sauce. Using lean ground beef also helps.
- Different protein options: You can substitute ground chicken (a mix of 50% lean and 50% dark meat) or extra-firm tofu. For tofu, press out excess water and crumble before cooking.
- Lighter fries options: I like using oven-baked fries, especially a mix of regular potato and sweet potato fries.
- Bulgogi make-ahead: You can prepare the bulgogi in advance, stopping before adding the cheese. Add the cheese only when you’re ready to serve.
- How to Assemble & Reheat on game day:
- Reheat the bulgogi in a skillet over medium-low heat with a splash of water or stock to loosen the sauce if needed. A microwave also works—cover and heat in short intervals until warmed through.
- If the sauce feels too thin, thicken it again with a small amount of slurry.
- Once heated, add the cheese and finish the dish starting from the cheese-melting step.
- Storage: Store the fries and bulgogi separately. The bulgogi keeps well in an airtight container in the fridge for up to 4 days.
- Freeze bulgogi: Freeze the cooked bulgogi (without cheese) for up to 2 months. For faster thawing, store it flat in a freezer-safe bag rather than in a thick block.
Nutrition
Nutrition information is automatically calculated, so should only be used as an approximation.
What to eat with Korean bulgogi fries
Bulgogi fries are rich and savory, so the best pairings are toppings and sides that add freshness, crunch, and acidity. These help balance the beef and cheese without making the dish feel heavy.
- Kimchi: Napa cabbage kimchi is my go-to, but bok choy kimchi and cucumber kimchi also work really well if you want something lighter and extra refreshing.
- Pickles: Simple pickles are great on the side, especially Taiwanese pickled daikon, pickled garlic, or Asian pickled cucumbers. They add contrast without competing with the flavors of the fries.
- Optional sauce: The fries are already full of flavor, but if you like a sauce, garlic aioli is a good option. For a quick twist, mix a little kimchi juice into the aioli to make a fast kimchi garlic aioli—tangy, savory, and easy to drizzle.
More ways to enjoy bulgogi
If you enjoy bulgogi flavors, here are a few other ways I like to cook and serve them:
- Ground Beef Bulgogi – A quick stovetop ground beef bulgogi cooked with plenty of sauce and eggs, served as a cozy rice bowl.
- Bulgogi Bibimbap – Marinated, sliced bulgogi beef cooked in one pan with lots of vegetables.
- Low-Carb Bulgogi Sushi Rolls – Bulgogi-style beef rolled in lettuce and nori with no rice, making them light, fresh, and low-carb.
- Whole30 Bulgogi Bowls – A hearty Whole30-friendly bulgogi bowl built with vegetables and protein, without rice or added sugar.
Made a dish and loved it? Please rate the recipe and leave a comment in the section below! It helps my blog grow organically, allowing me to continue sharing free and awesome content with you. Thank you!


I love loaded fries and these look delicious, I will try them soon.